In an emulsion, different liquids come together without dissolving into one another. Each keeps its own character.
That’s the idea here, too. A photo editor, a painting studio, a photo library, a design space, and a diagramming tool. Distinct workspaces that belong together in one creative app.
FIVE WORKSPACES. ONE EMULSION.
Your projects in Home. Familiar controls across your work. Open source, with room to make it yours.
FIND YOUR ELEMENT
A space for every part of the idea.
Get to know each workspace through real application screenshots, then explore the guides to get started.
01 / PHOTO
Every detail. Every layer.
For the image you have in mind.
Retouch photographs, build layered compositions, and shape light and colour. Keep the tools for selections, masks, and fine adjustments close to your canvas.
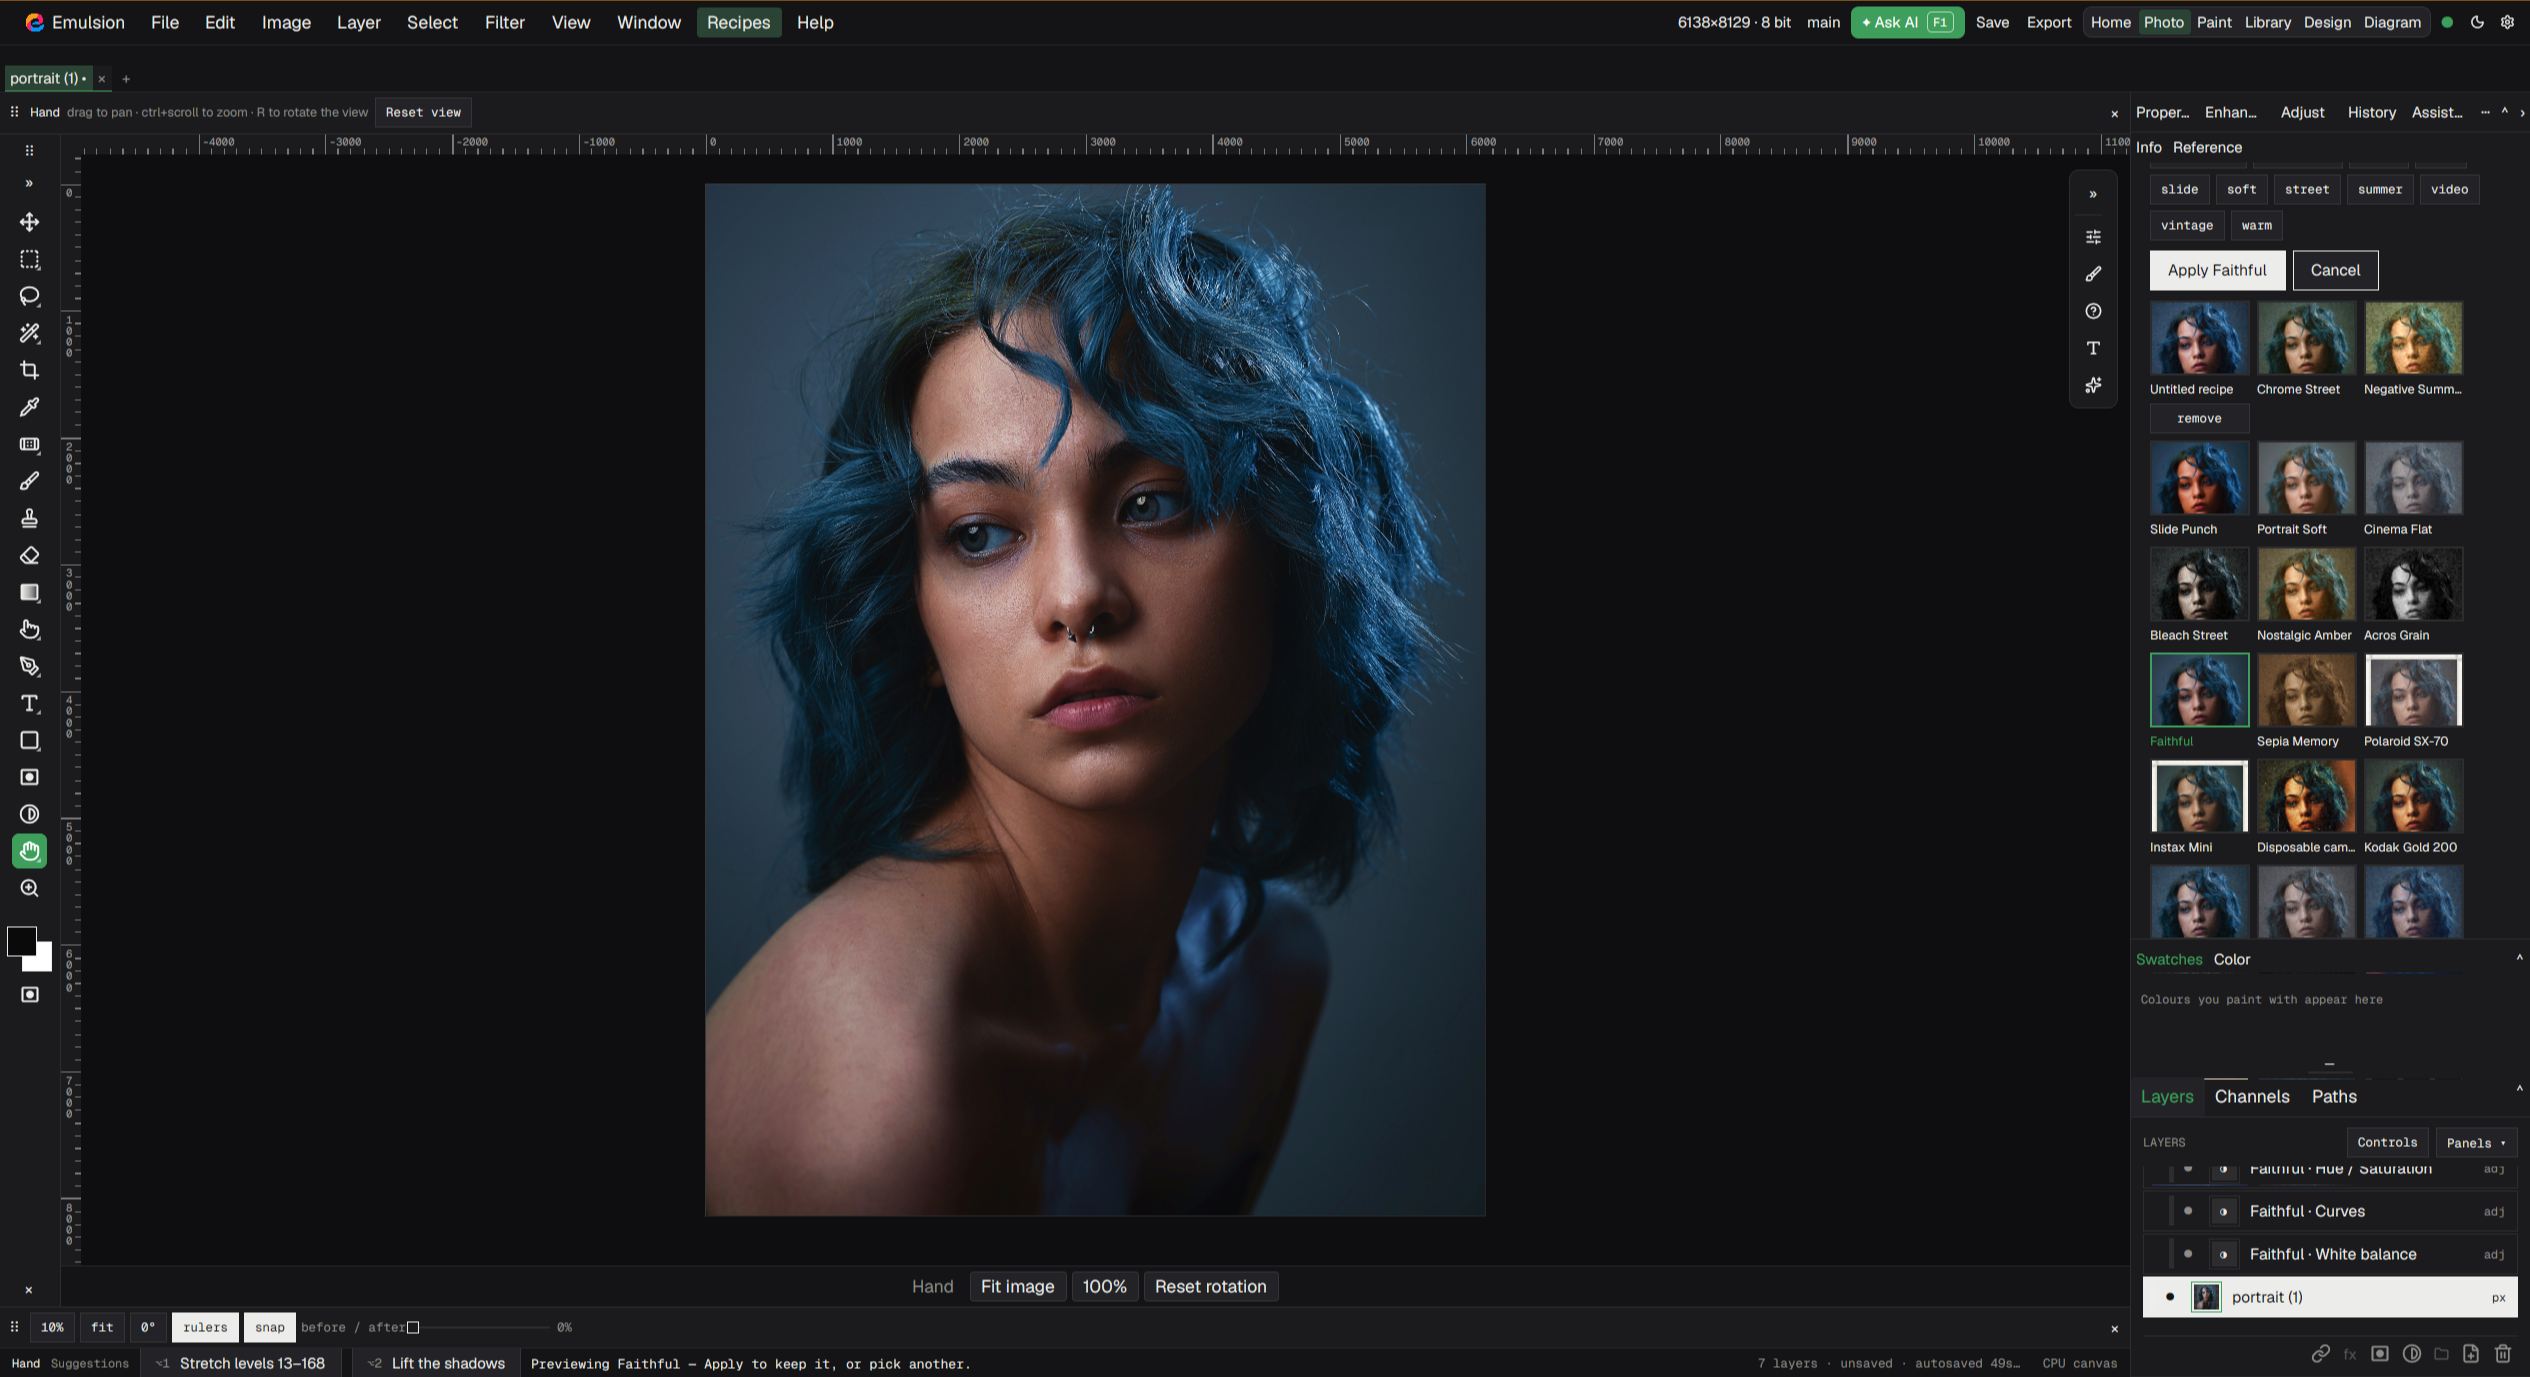
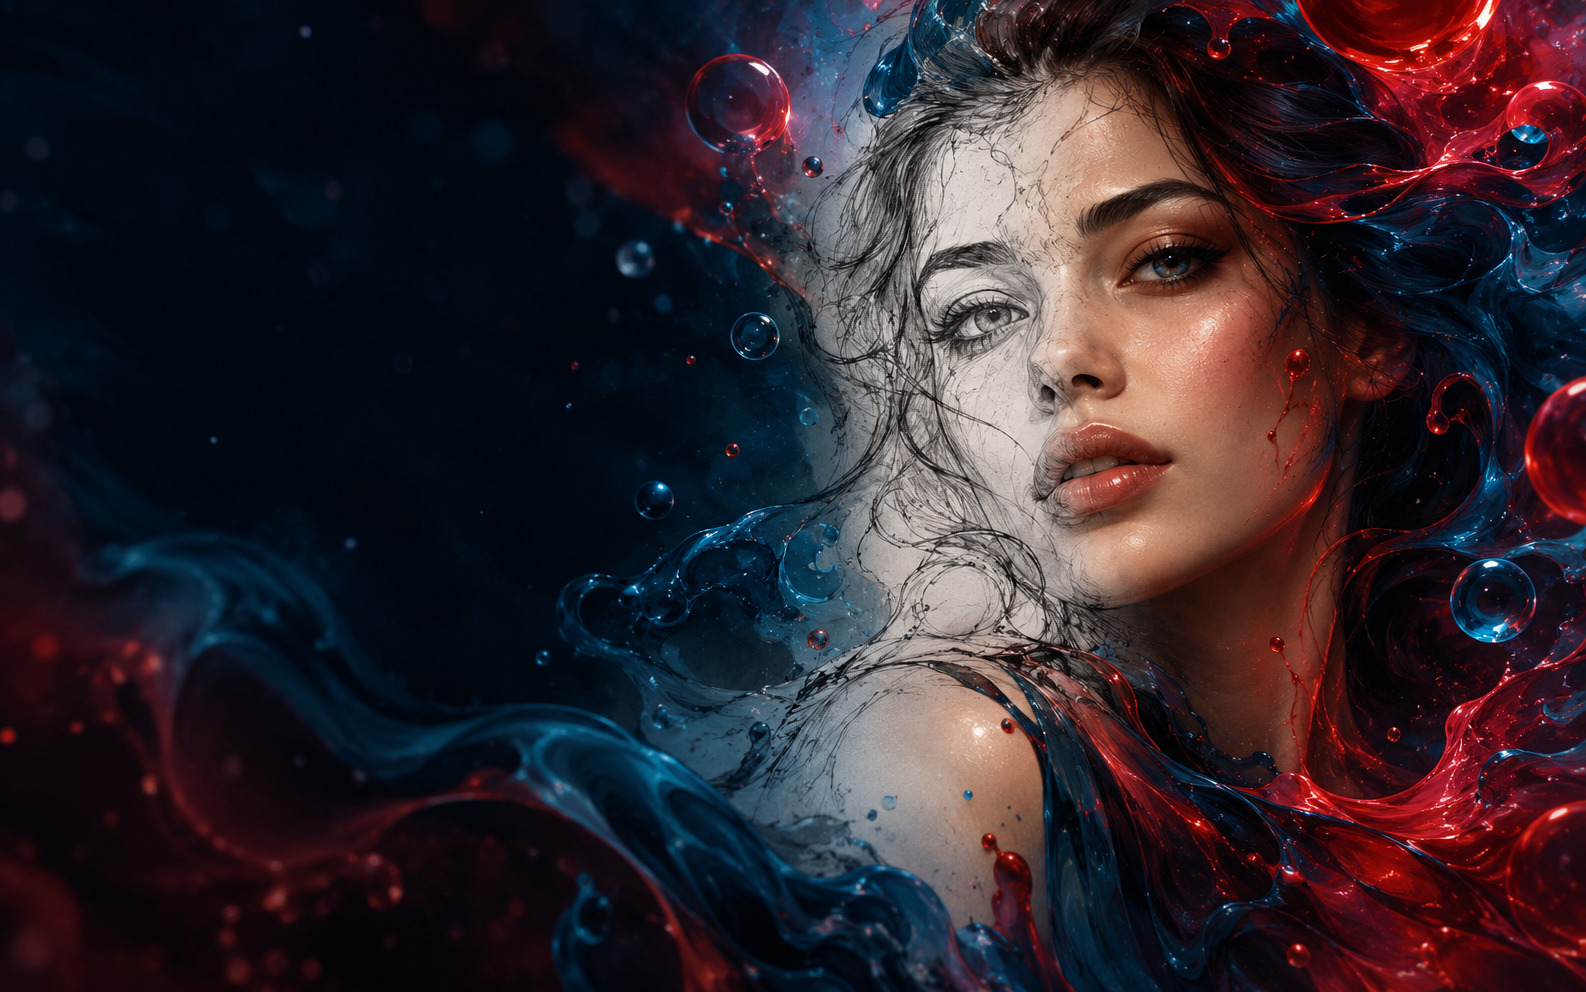
Portrait editing in Photo · preview recipes and refine the result with editable adjustment layers. Select the image to view it full size.
02 / PAINT
Start with a single mark.
For the things only you can draw.
Make a sketch, develop an illustration, or paint from a reference. A dedicated painting workspace puts brushes, colour, and your canvas at the centre of the process.
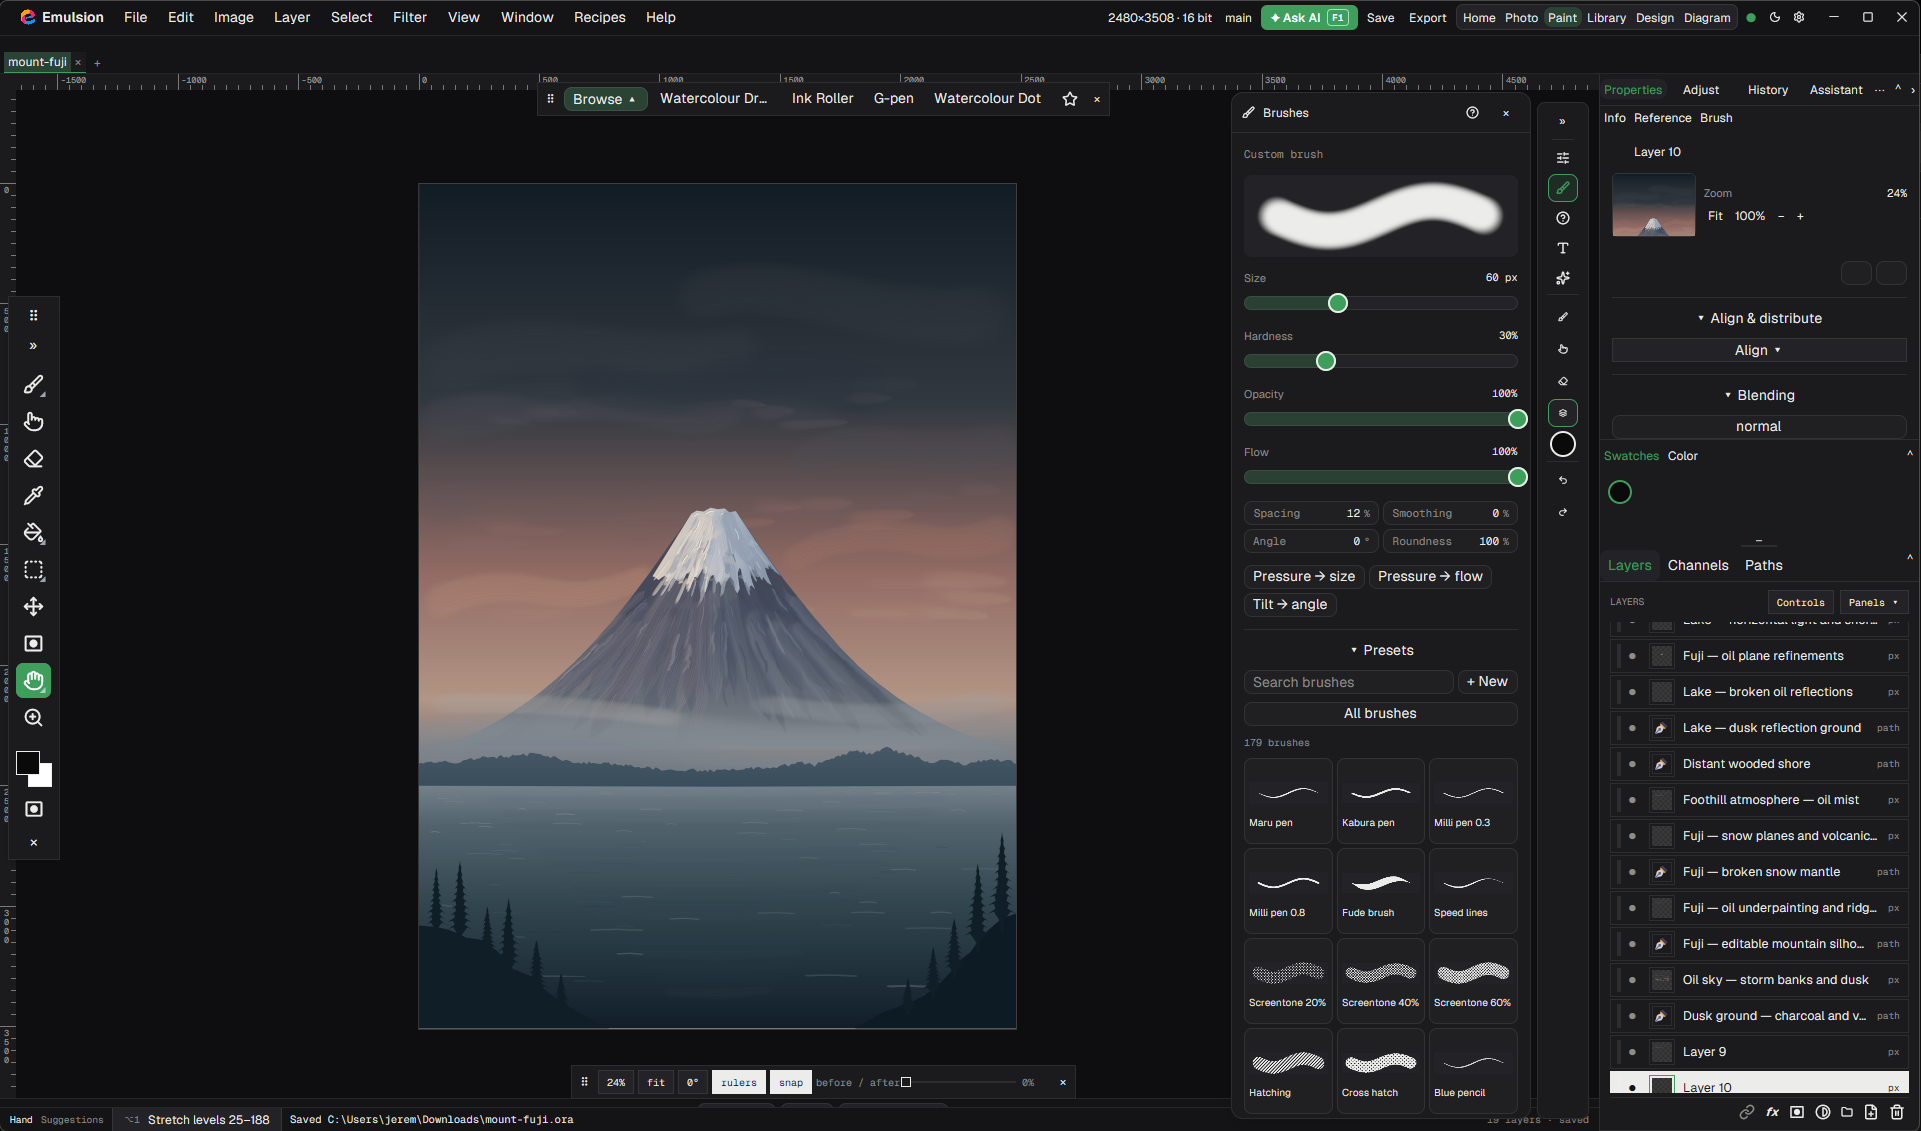
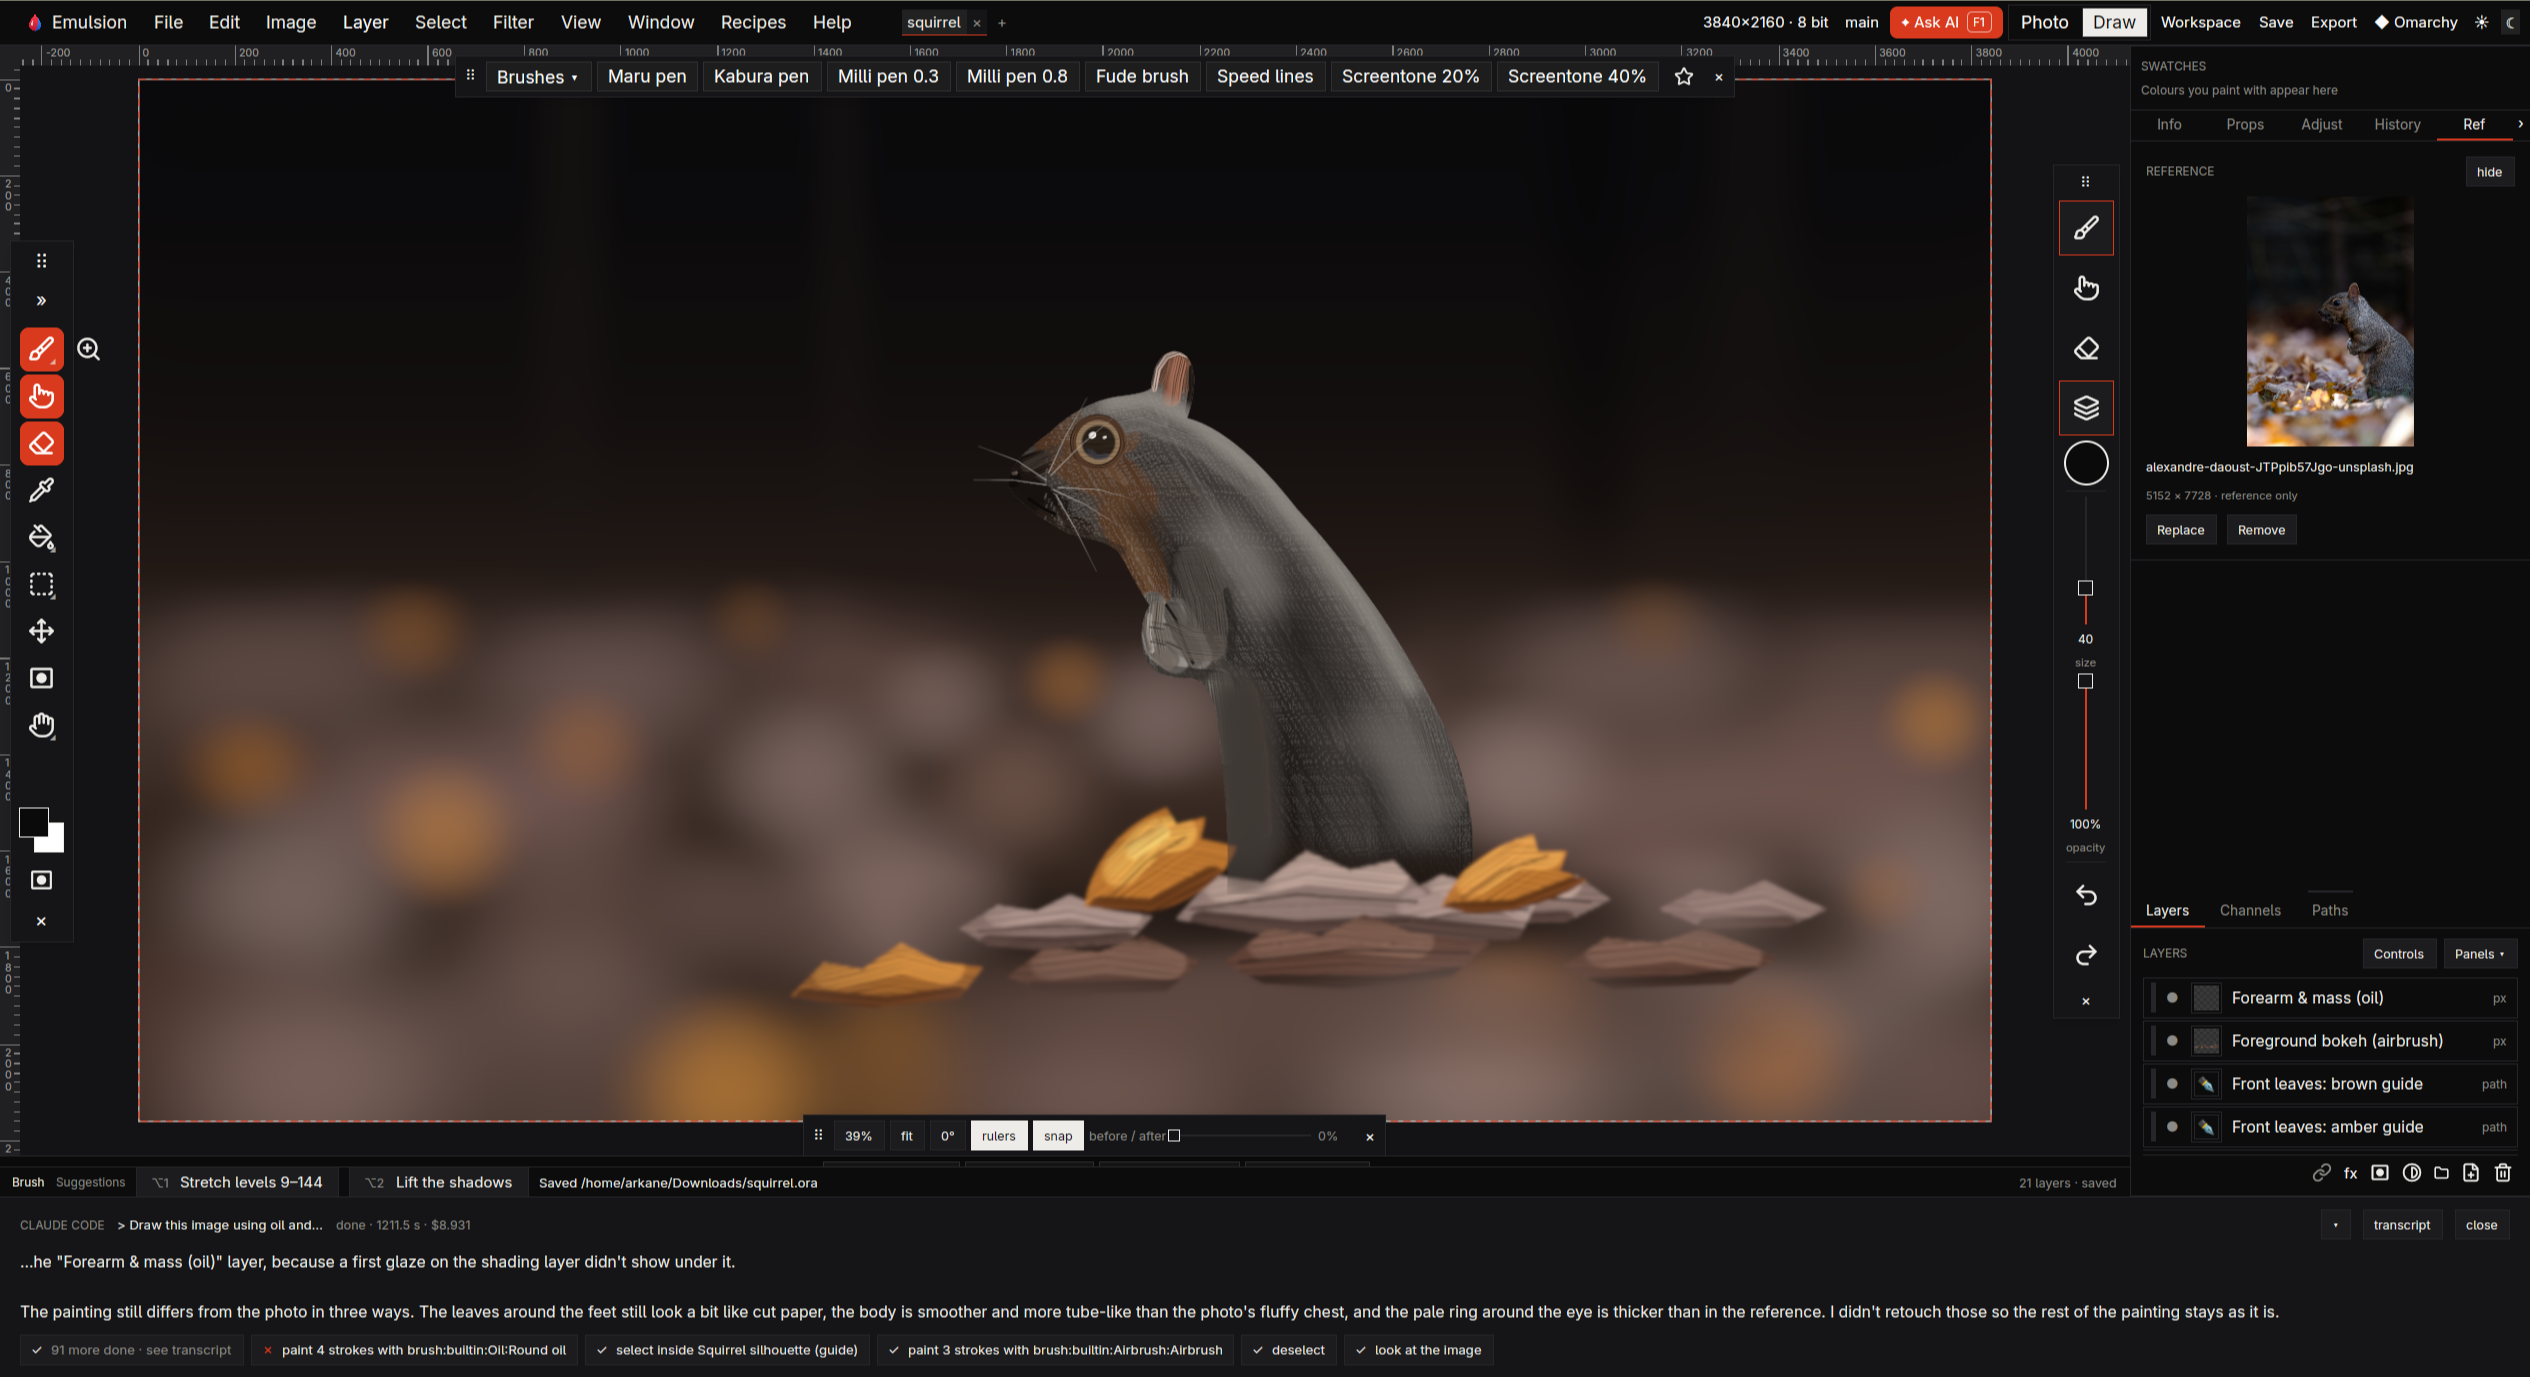
Paint in Emulsion · pressure-sensitive brushes, 55 built-in brushes plus imported brush libraries, and editable layers. Select the image to view it full size.
03 / LIBRARY
See the collection. Find your look.
For a photograph. And the next thousand.
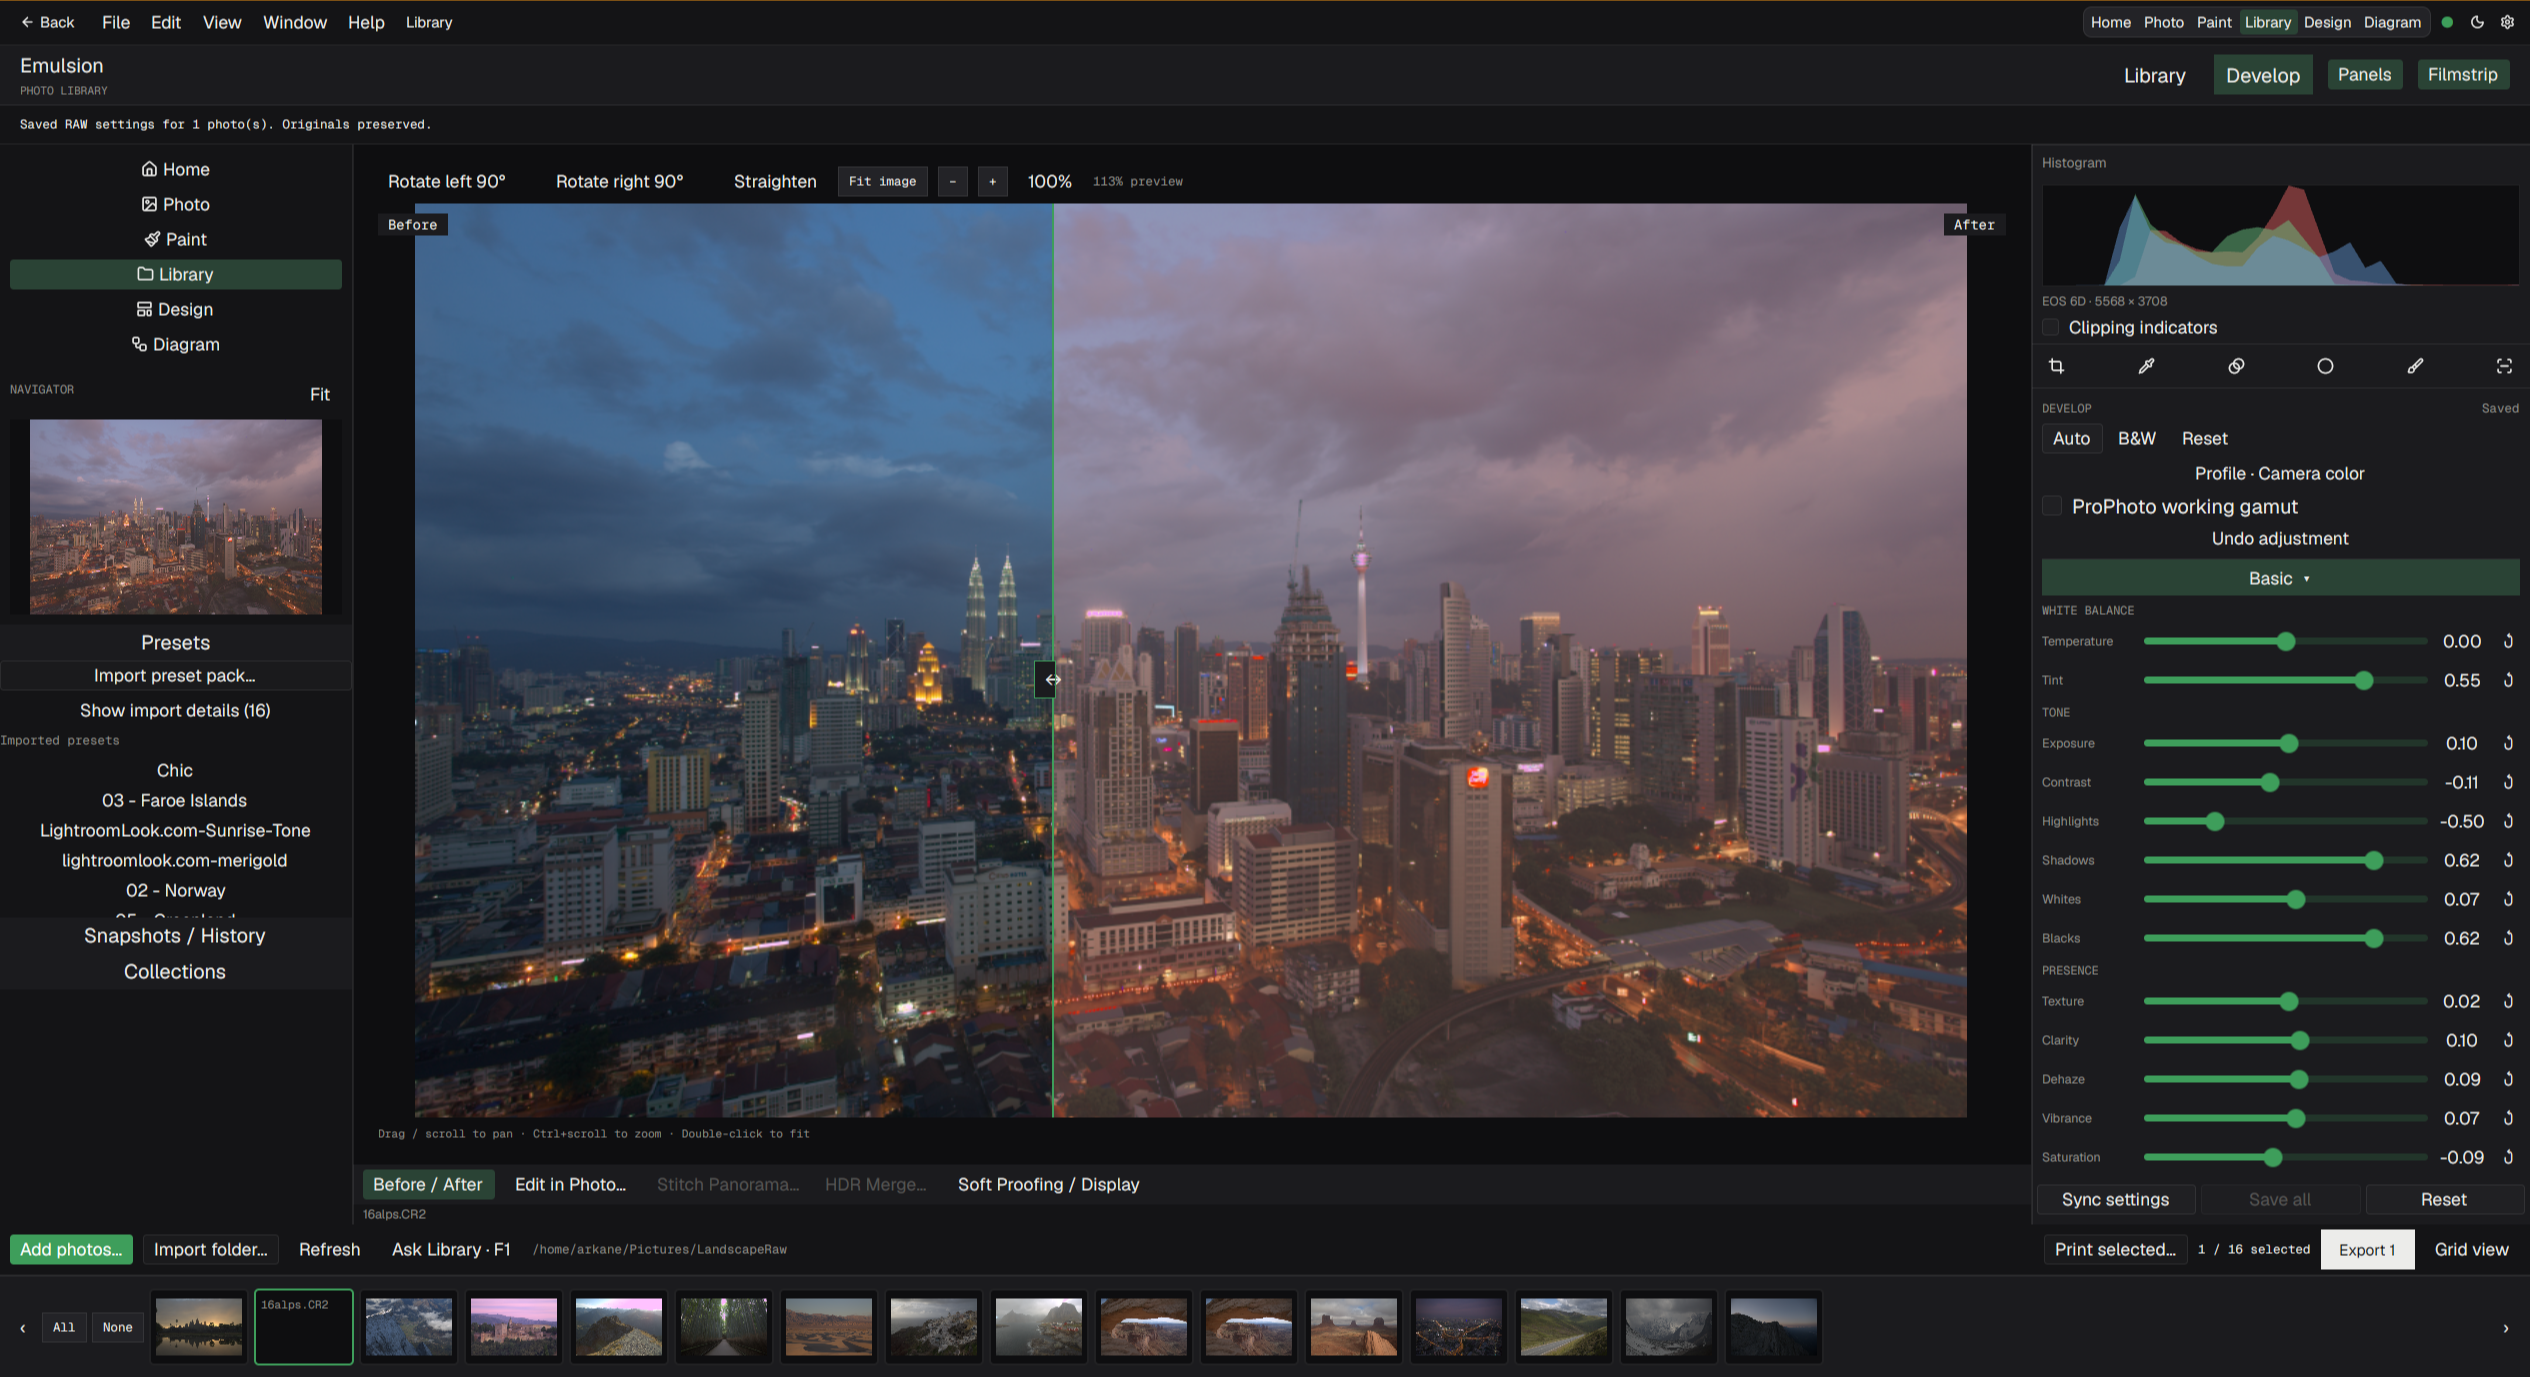
Keep folders, collections, and your photographs in view. Find the keepers with ratings and filters, bring your presets into Develop, and compare each edit before exporting the set.
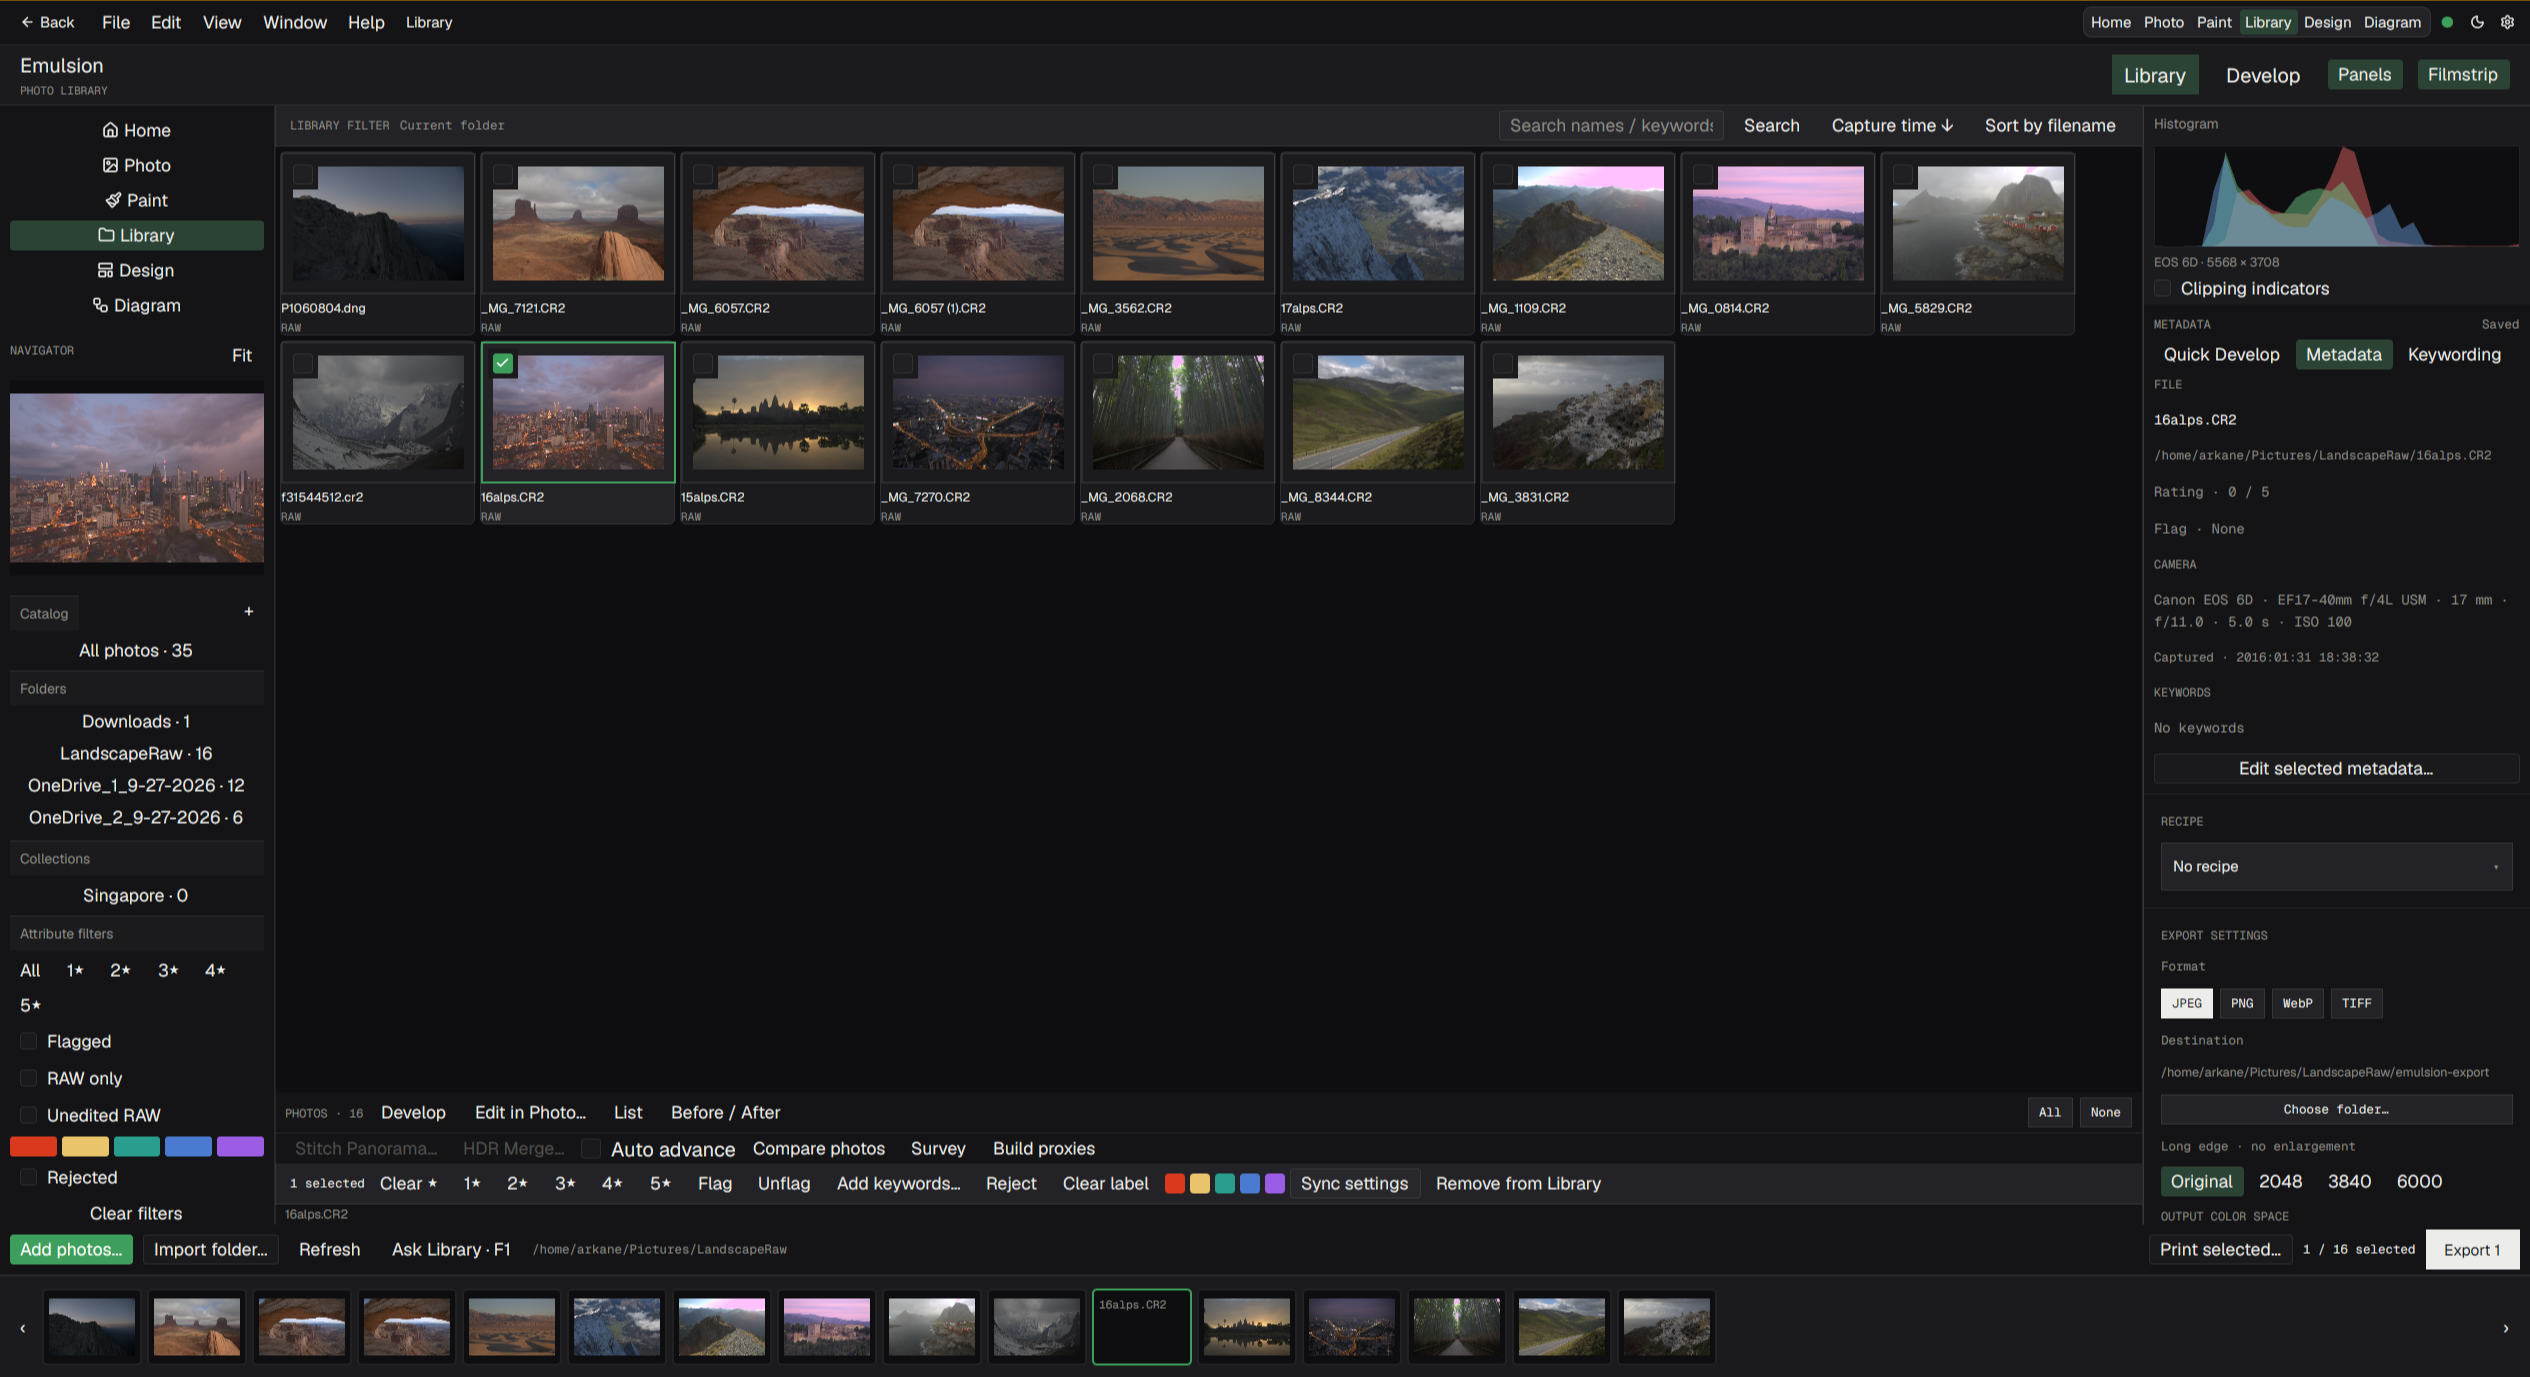
The Library panel · browse folders, filter photographs, inspect metadata, and prepare an export. Select any screenshot to view it full size.
Bring your presets.
Open Presets in Develop and choose Import preset pack…. Add a pack, select a preset, and use Before / After to see what changed.
Your presets beside the photograph, with the original and edited appearance in one view.How to add presets →
Refine the details.
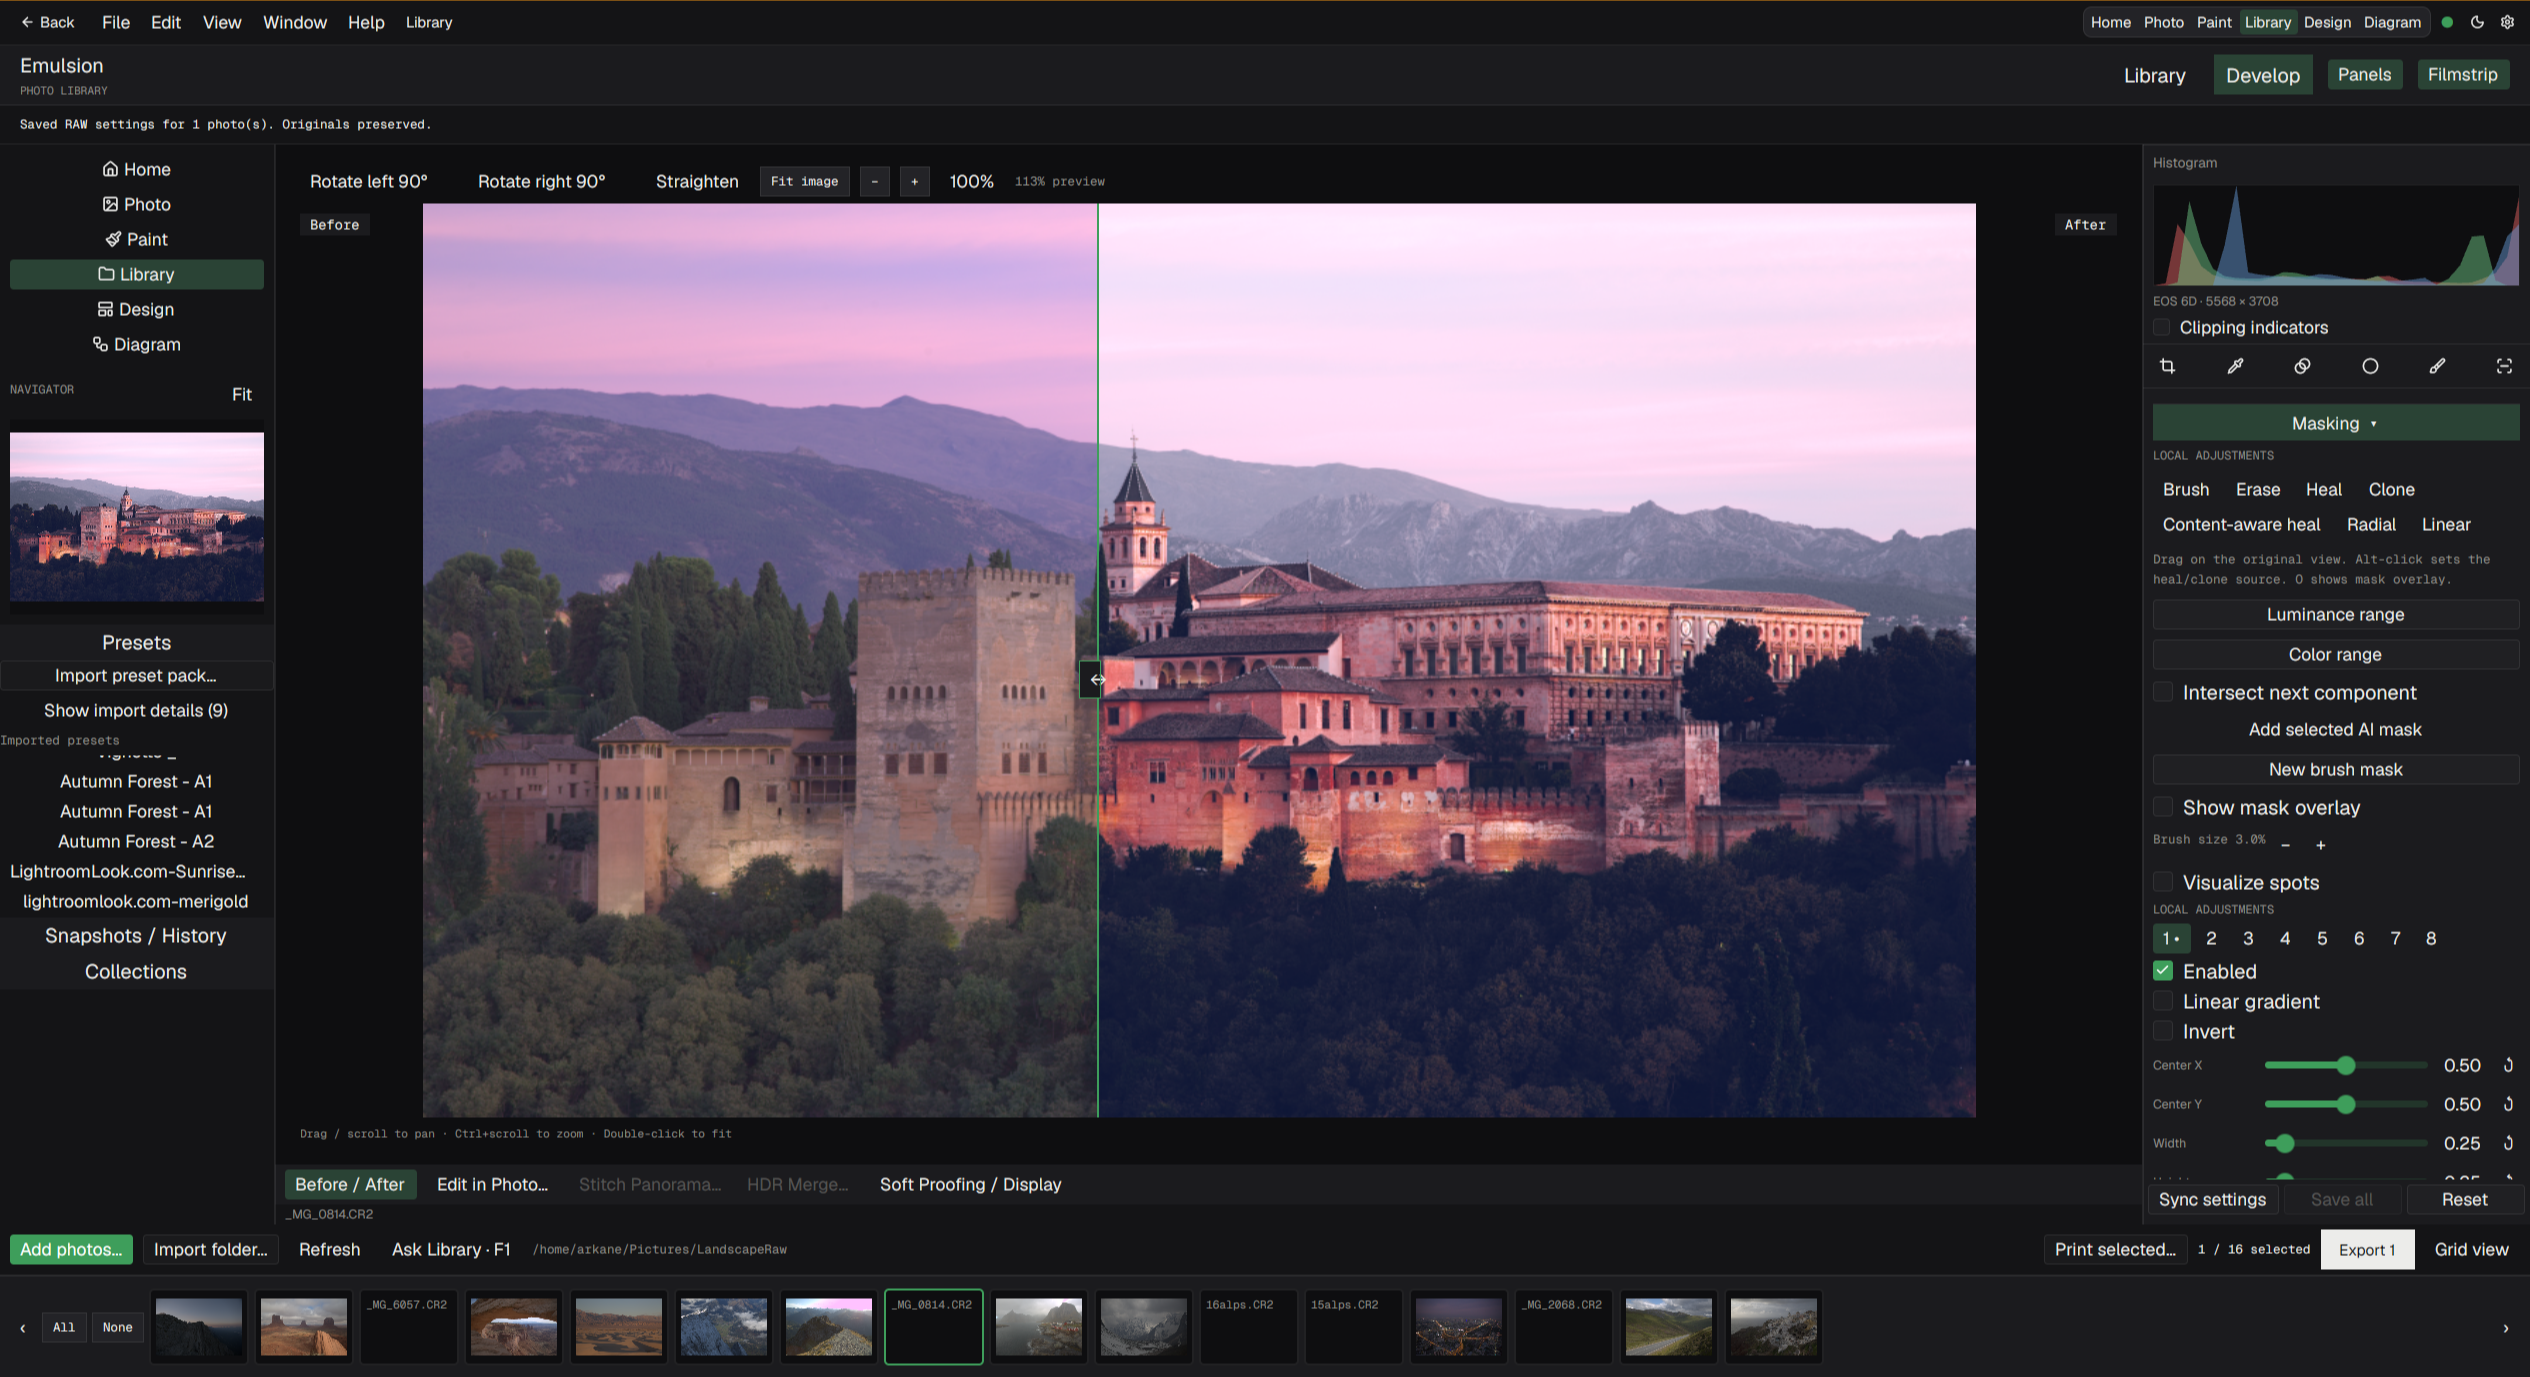
Keep the filmstrip close as you move through a shoot. Use local masks to refine part of a photograph, then compare the result with its original.
Local adjustments in Develop · masks, a Before / After view, and a filmstrip for the rest of the shoot.
04 / DESIGN
Give the idea its own shape.
For the page, the post, and the presentation.
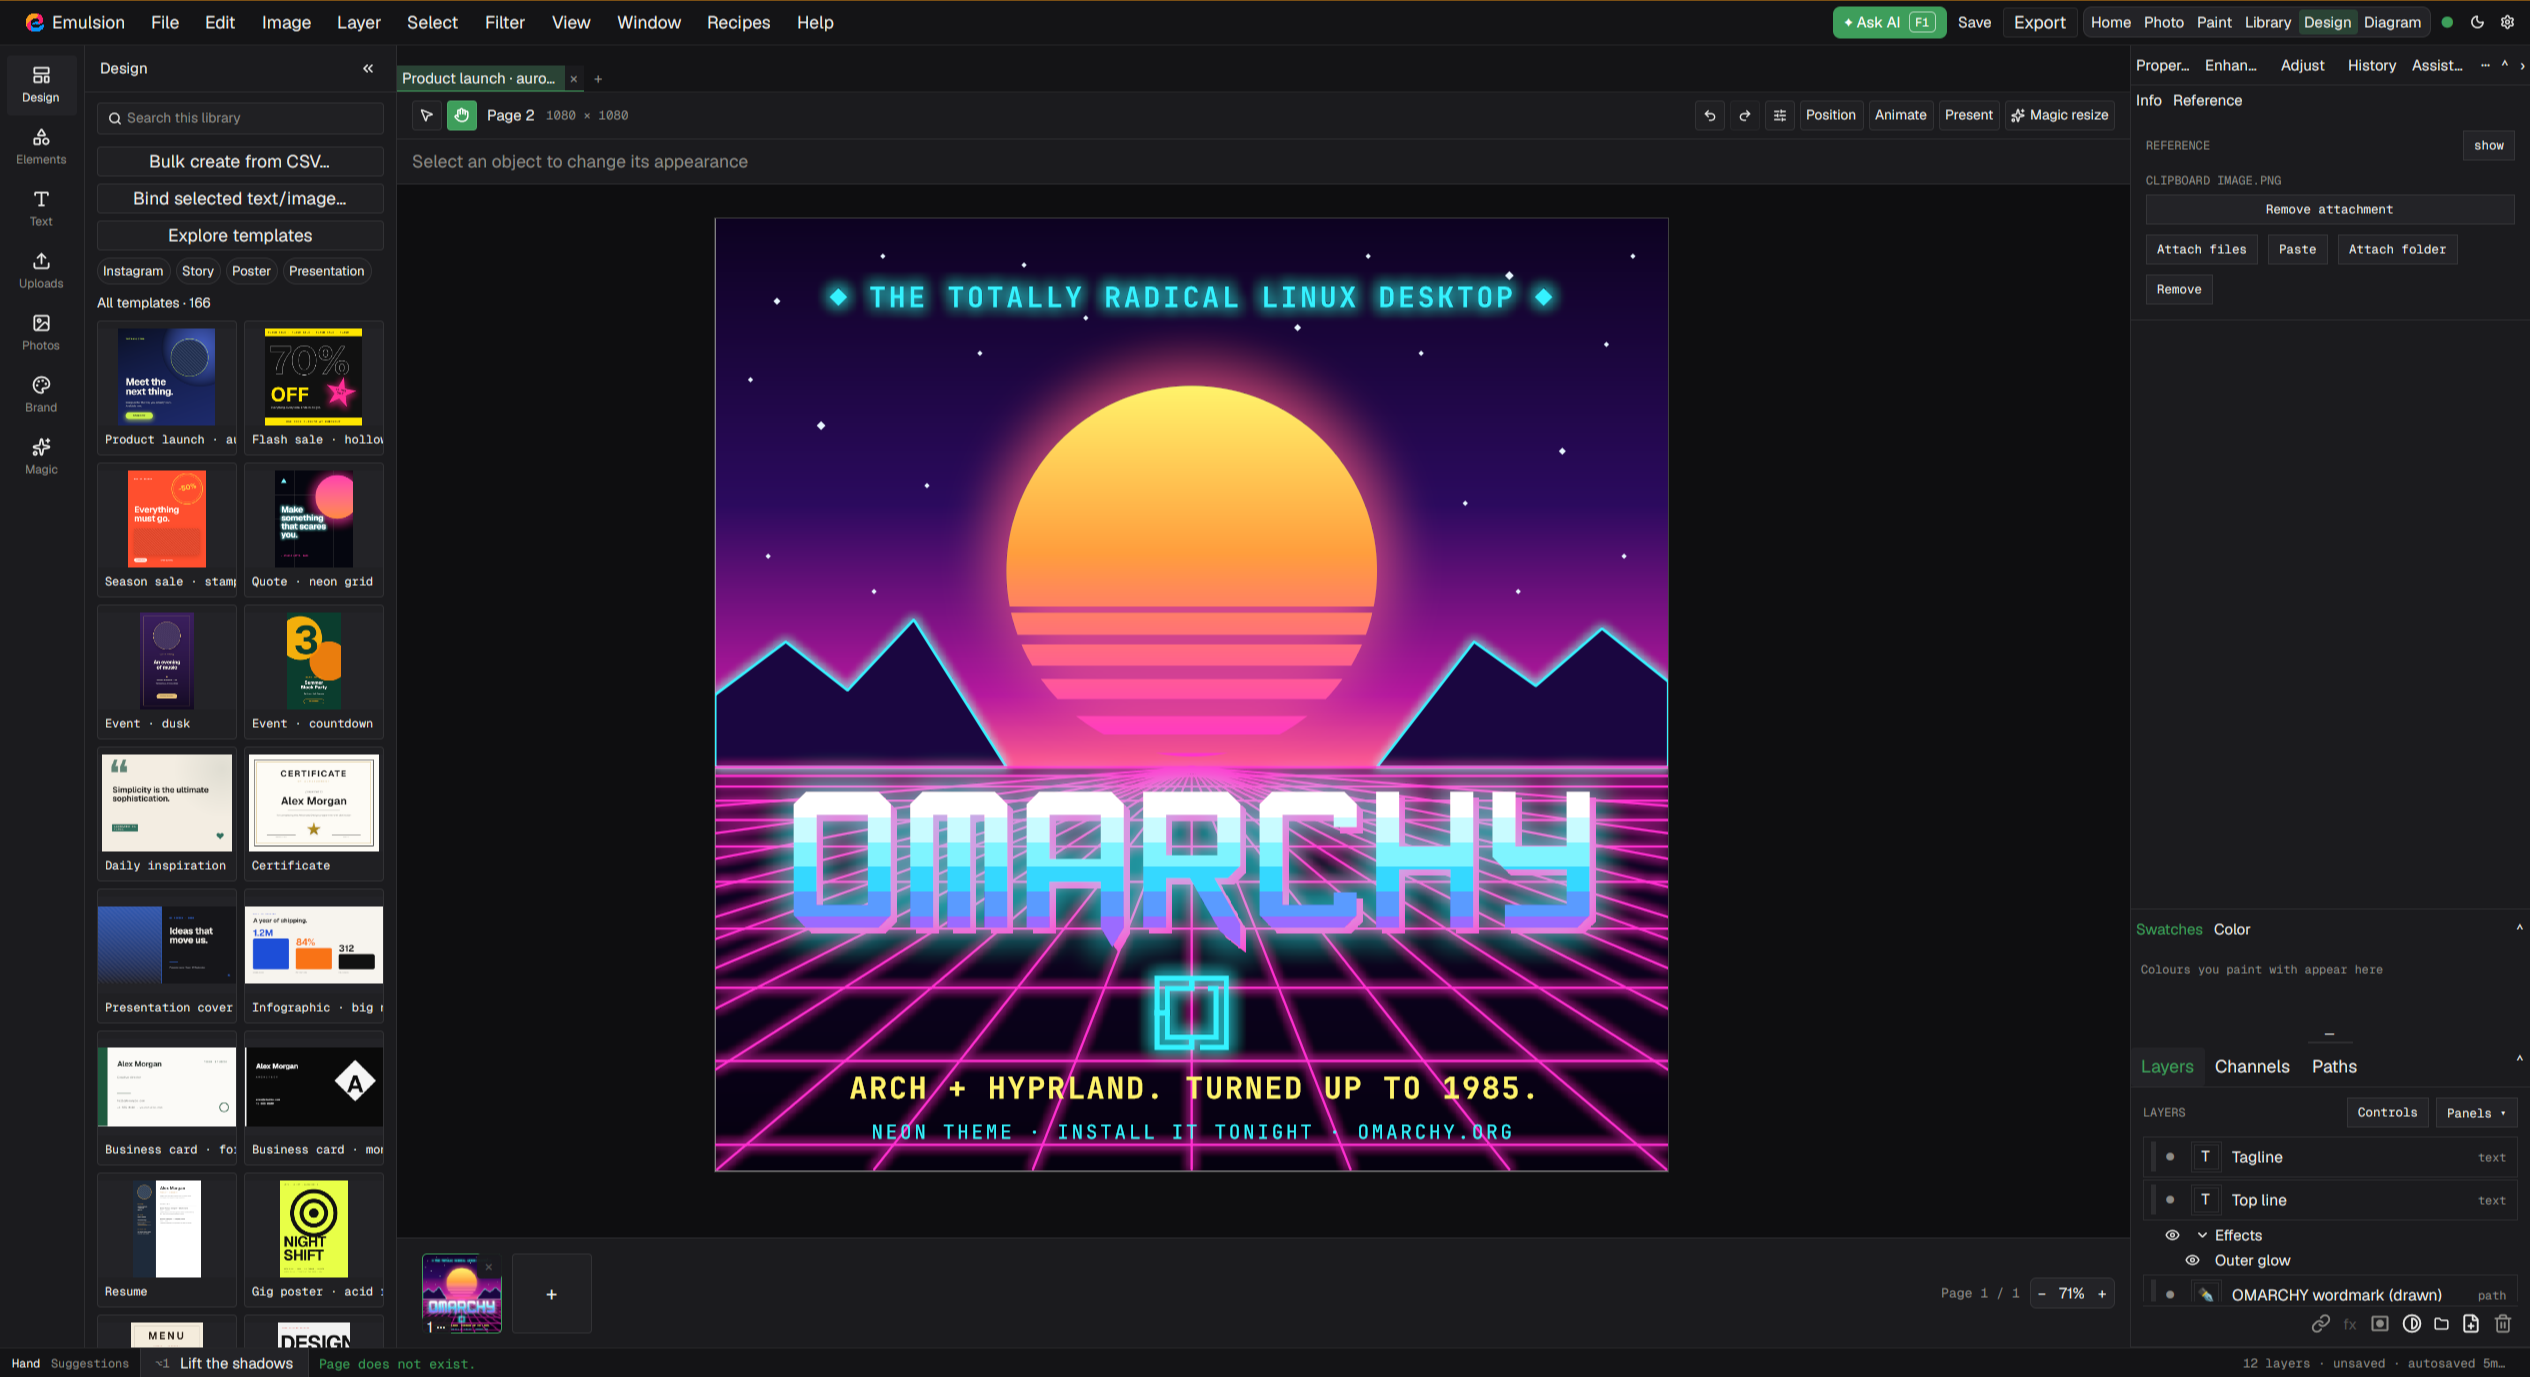
Start with a template or a blank canvas. Bring images, typography, and editable elements together across layouts and pages, with room to make them your own.
Design in Emulsion · a neon poster built with editable text, paths, and glow effects, with templates and layers close at hand. Select the image to view it full size.
05 / DIAGRAM
Make the connection. Make it clear.
For ideas that need a bigger picture.
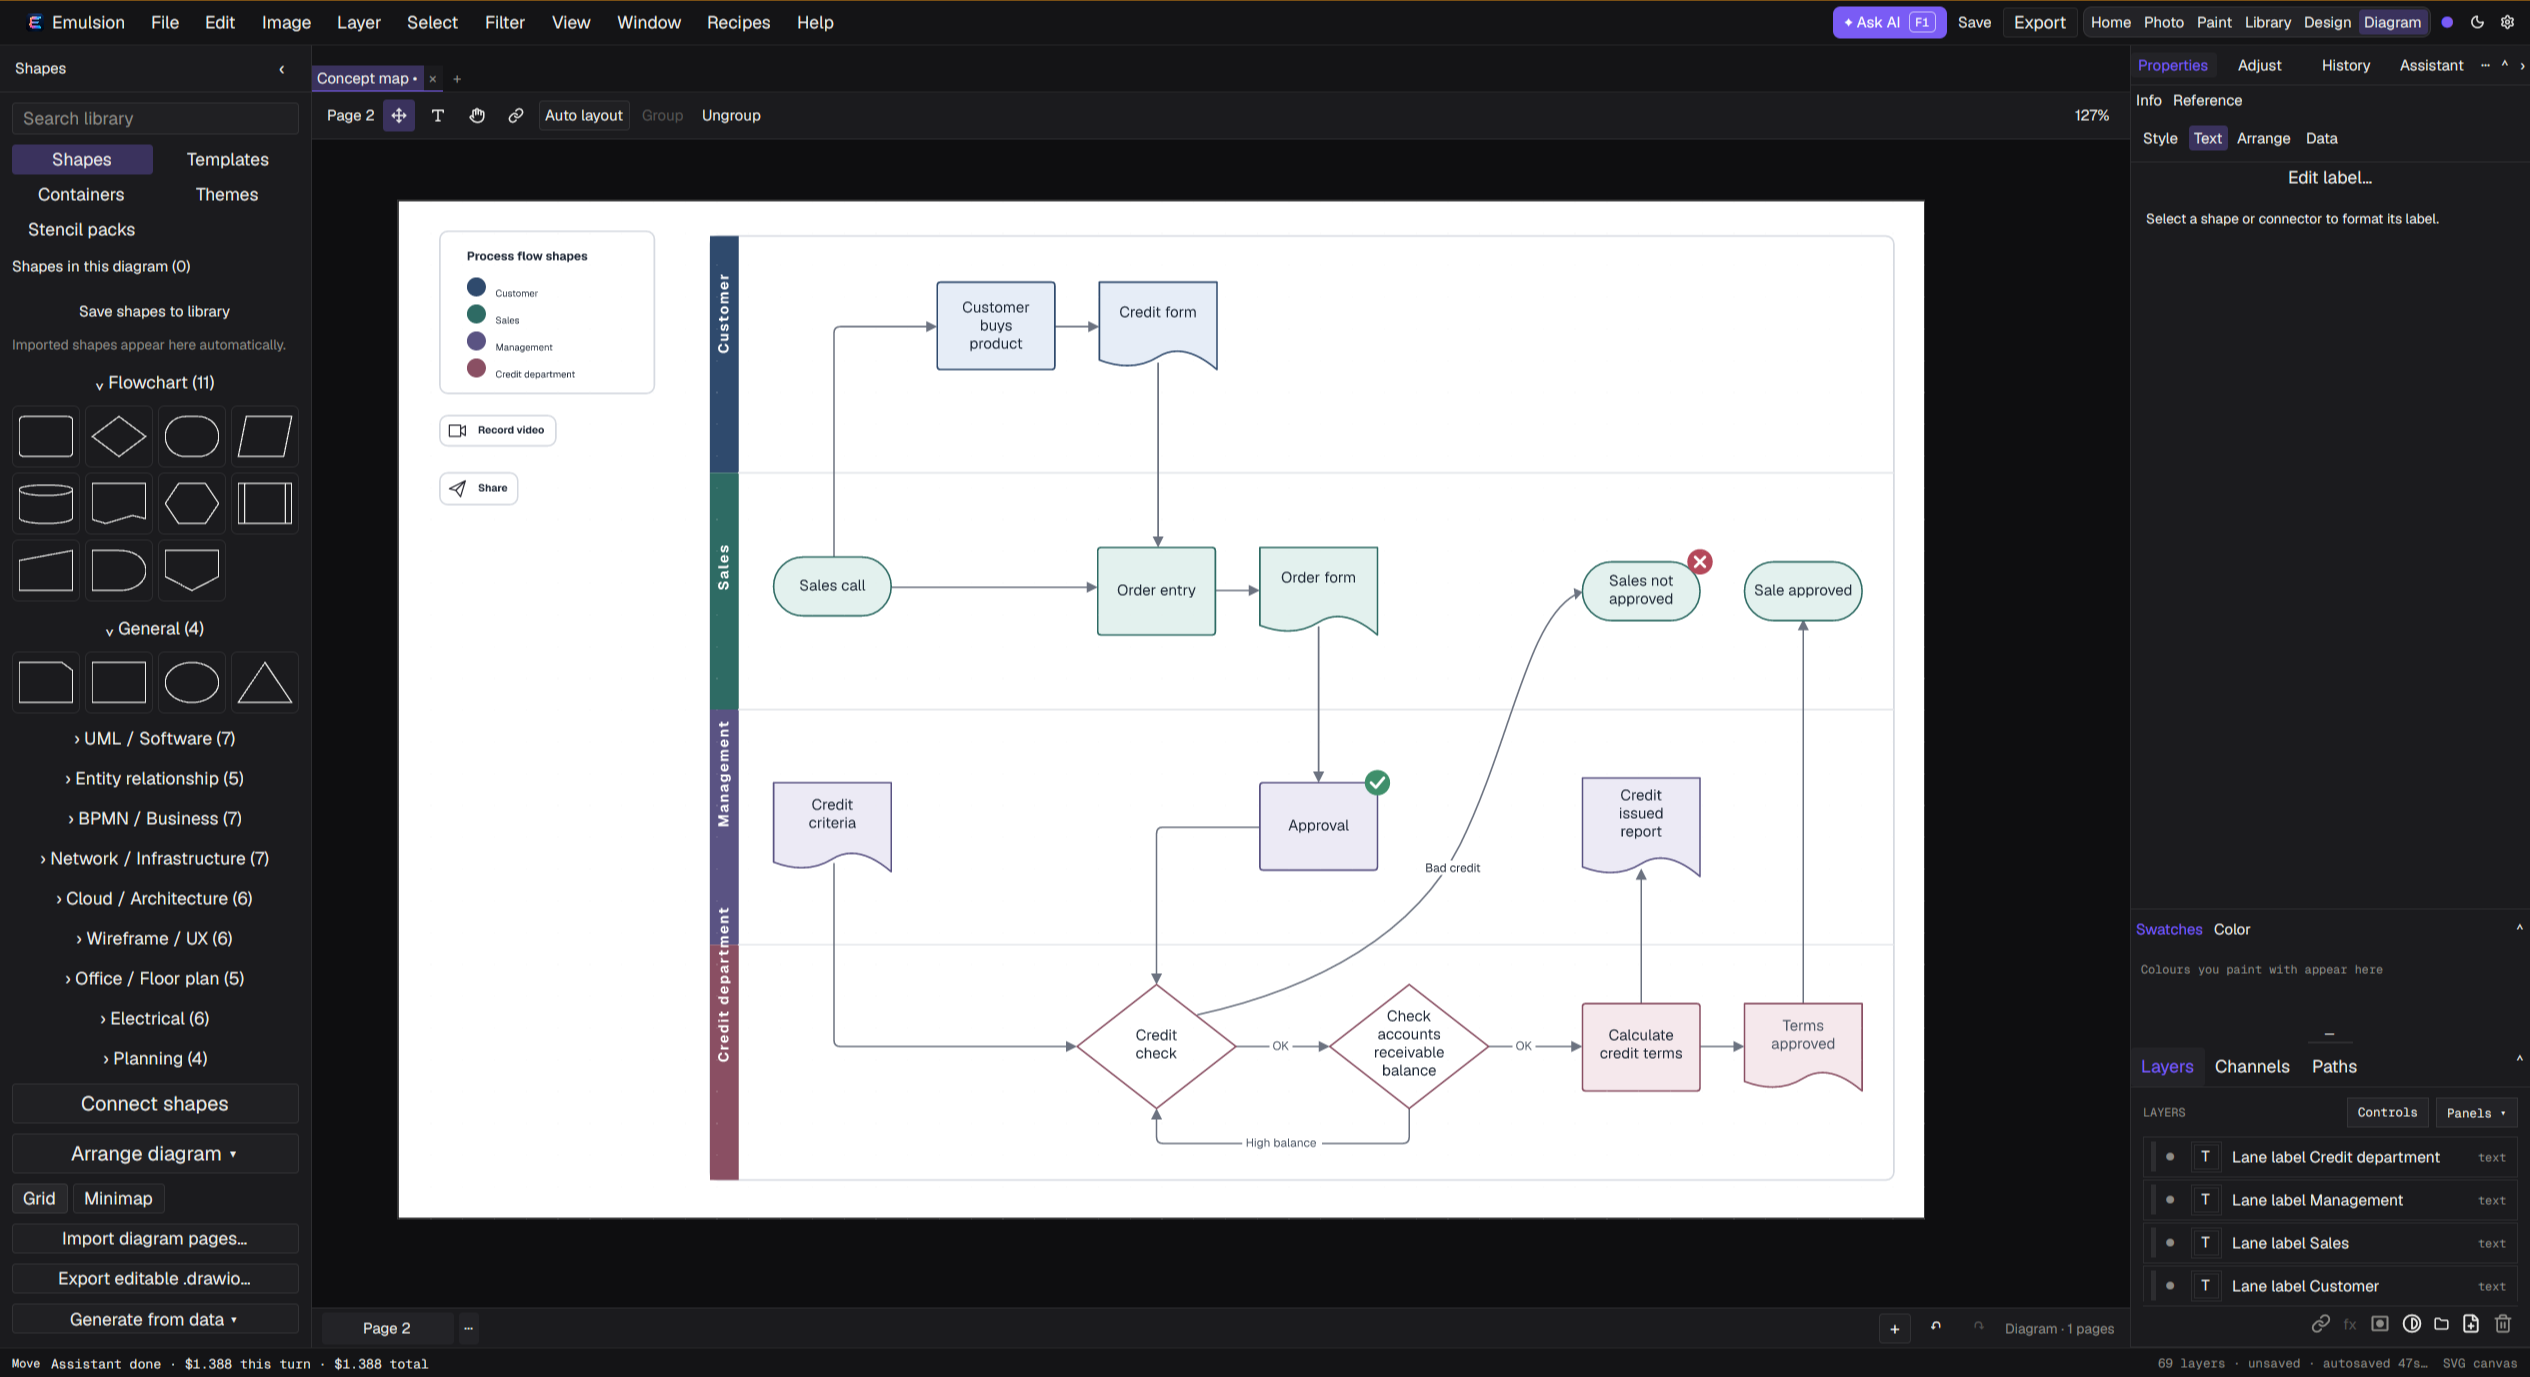
Map a process, explain a system, or work through a concept. Use shapes and connectors in a dedicated diagram workspace, alongside the rest of your creative work.
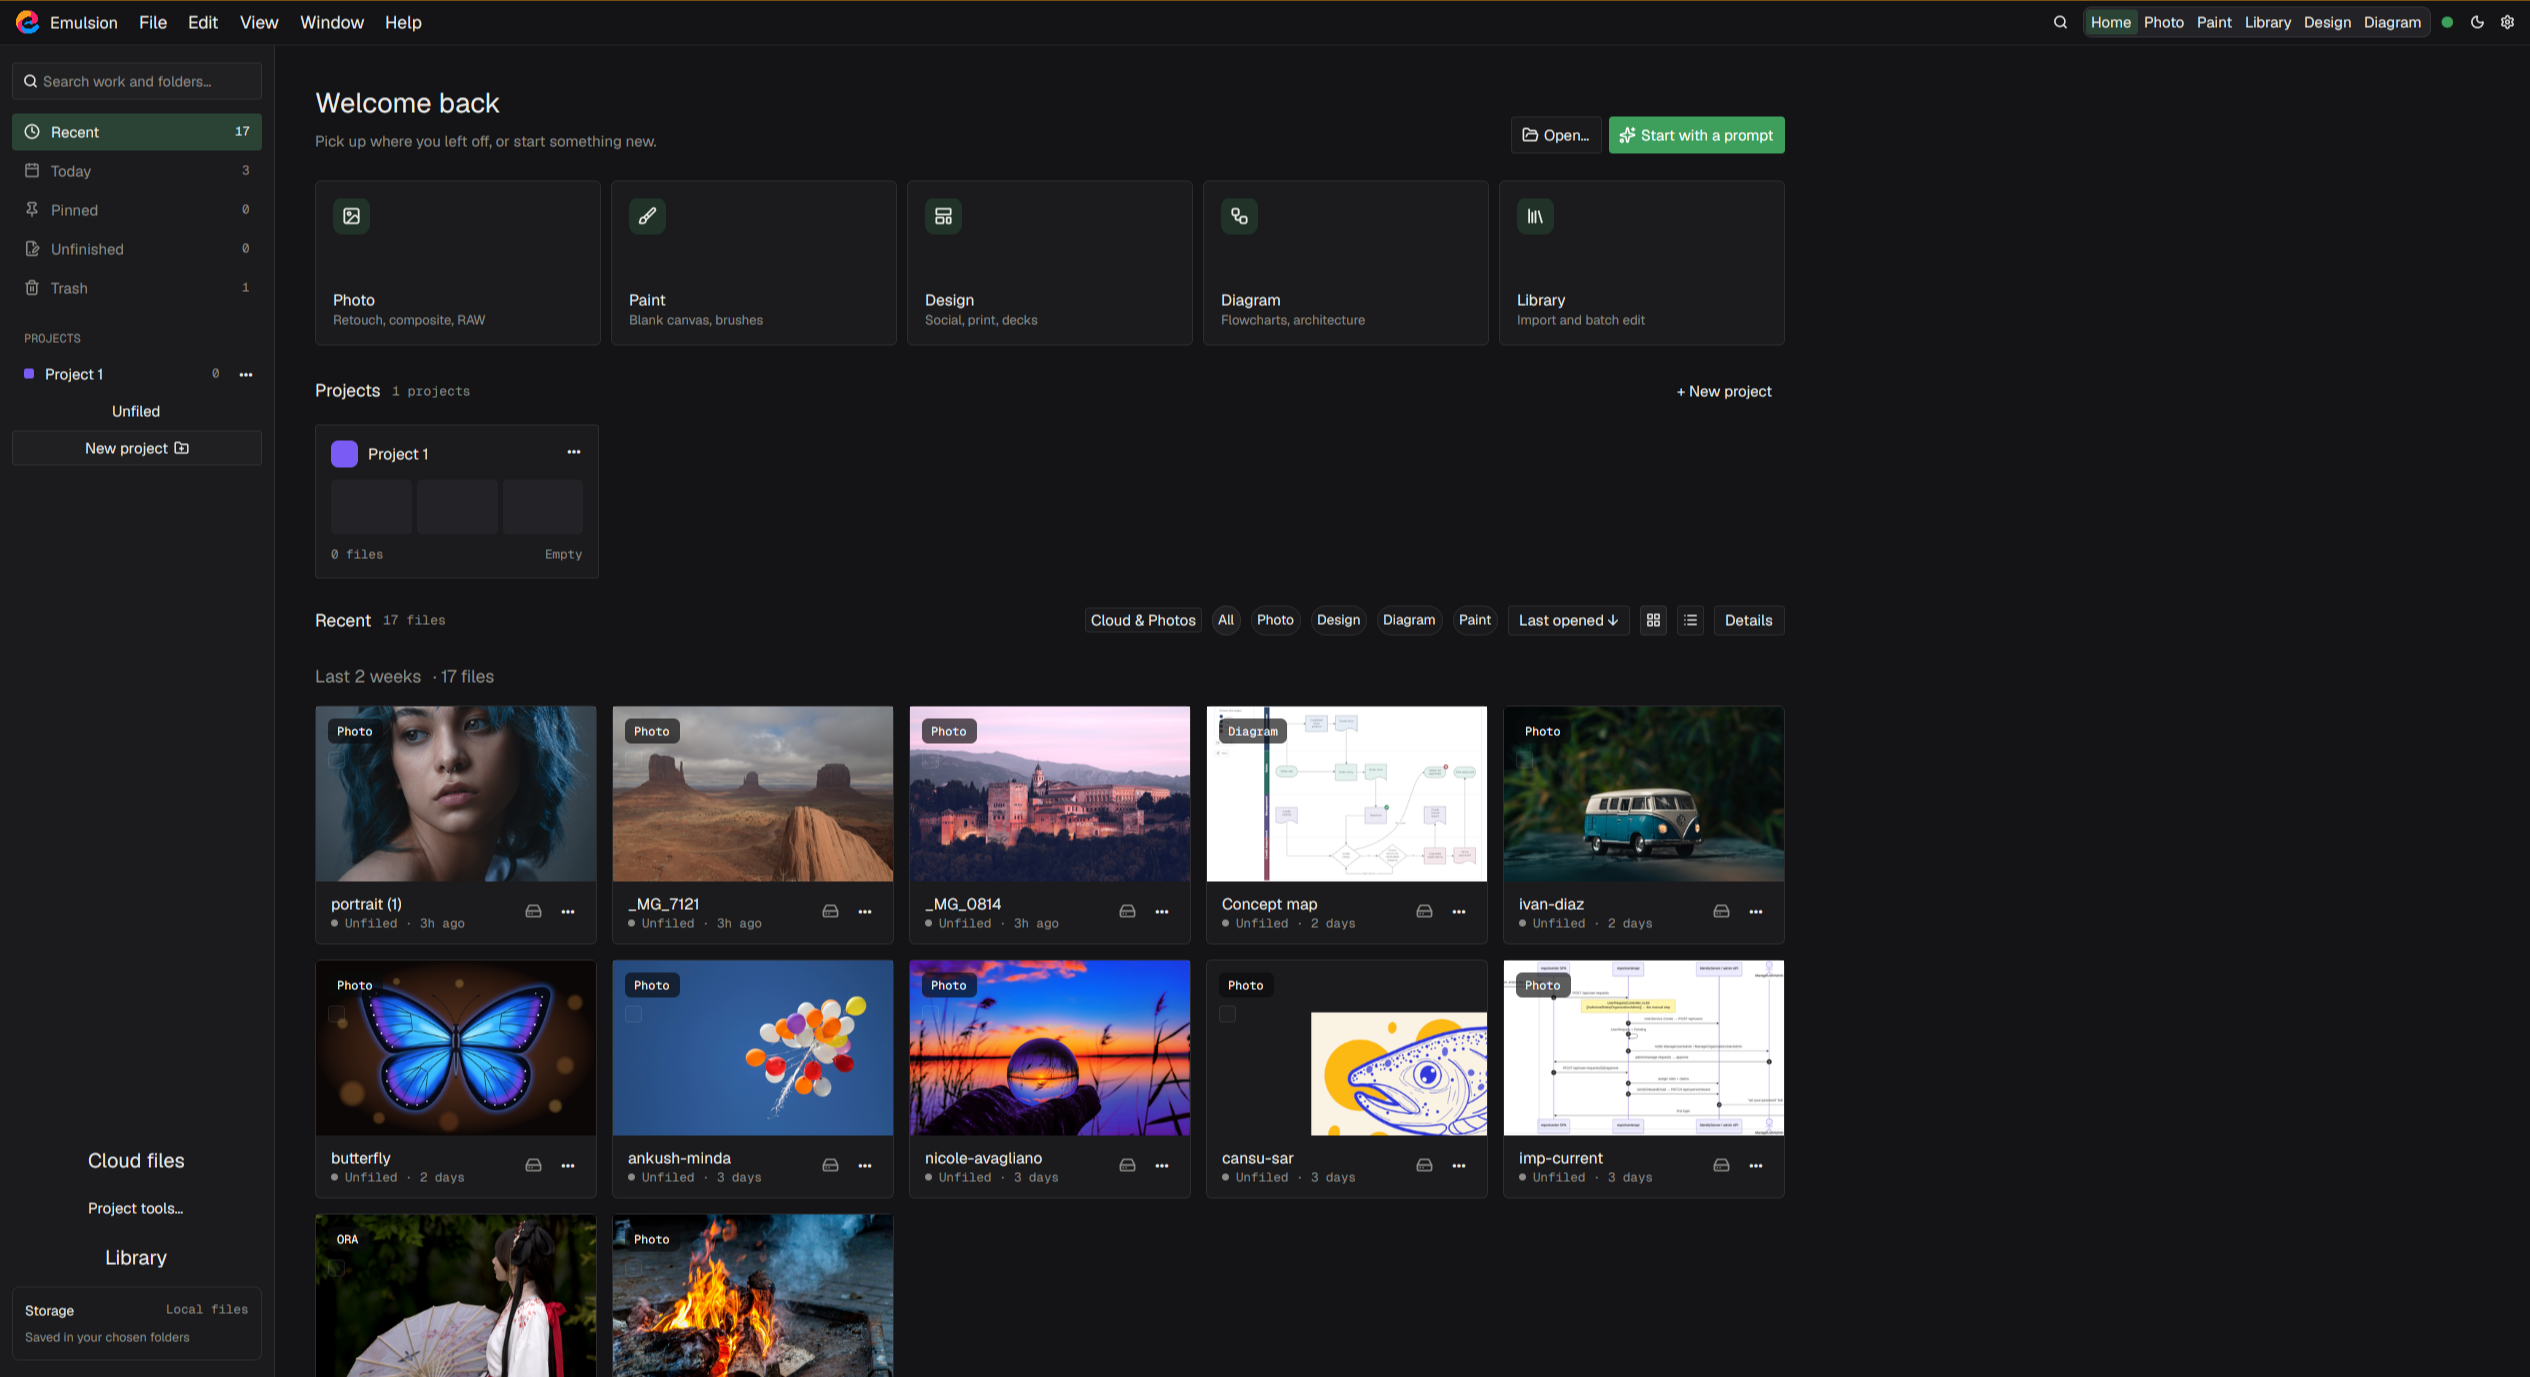
Pick up a recent file or start in Photo, Paint, Library, Design, or Diagram. Organize work into projects, search your files, and use each project’s menu to rename it or remove the grouping while keeping its files.
HOME / PROJECTS & RECENT FILES
WHAT YOU CAN DO
Different tools. A connected creative process.
Choose the workspace that fits the task. Each has its own tools, with your projects close at hand in Home.
01 / PHOTO
Shape the image.
Retouch with clone and heal, isolate an edit with selections and masks, and combine photographs, text, and paths in layers. Bring developed photos in from Library, then refine colour with adjustment layers and editable effects.
Start a blank canvas, keep a reference beside it, and paint on separate layers. Find and pin brushes in Brush Library, then tune shape, grain, and dynamics in Brush Studio.
Import folders, organize collections, and find photographs with ratings, flags, and keywords. Develop images without overwriting originals, synchronize settings, and export selected photos.
Start empty or choose an editable template for a social post, poster, invitation, or presentation. Arrange text, shapes, and image frames; build layouts across multiple pages.
Start empty or use a flowchart, org chart, timeline, or concept map. Connect editable shapes, label relationships, and use containers and alignment to make the structure clear.
Return to Home for projects and recent files. Choose a light or dark interface, or follow your live Omarchy theme on Linux. Your artwork’s colours stay unchanged.
Retouch a portrait, combine photographs, and refine a look with editable adjustments. Photo brings selections, masks, clone and heal, text, and paths into one layered document.
Open an image in Photo, or choose Edit in Photo… after developing it in Library.
Preview a recipe, adjust colour and curves, and use selections or masks to control where an edit applies.
Save an .ora project to keep your layers and history, then export a finished image.
Camera RAW files open in Library Develop. Edit in Photo creates a new document from the developed pixels; later Library edits do not change that document.
A squirrel study with its reference, editable layers, brush presets, and assistant conversation. Select the image to view it full size.
LIBRARY / ORGANIZE, DEVELOP & EXPORT
Develop the photo. Keep the original.
Import a shoot, find the keepers, and develop a consistent treatment. Supported camera RAW files open in Library Develop, where exposure, white balance, curves, colour grading, lens corrections, and local masks work from the original.
Rate, flag, and group photographs in the catalog. Open a selected photo in Develop.
Apply a preset or adjust the controls, compare Before / After, and synchronize selected settings across photographs.
Export the selected images, or choose Edit in Photo… once the settings are saved to continue with layers and retouching.
Library automatically saves development settings in Emulsion sidecars beside the originals. Keep both when moving or backing up photos. Camera RAW support varies by camera and file.
Develop in Library · presets, tone controls, and Before / After, with Edit in Photo available for the next stage. Select the image to view it full size.
DESIGN / LAYOUT & PRESENT
From a blank page to something worth sharing.
Make a single graphic or a complete set of pages. A template supplies an editable starting point; a blank document gives you room to build your own.
Choose Design, then a template or Blank document. Set a custom canvas size when starting empty.
Edit text, replace frame images, and arrange objects. Add pages to build a presentation or a series.
Save the editable .emu project. Present your pages, or export artwork for sharing.
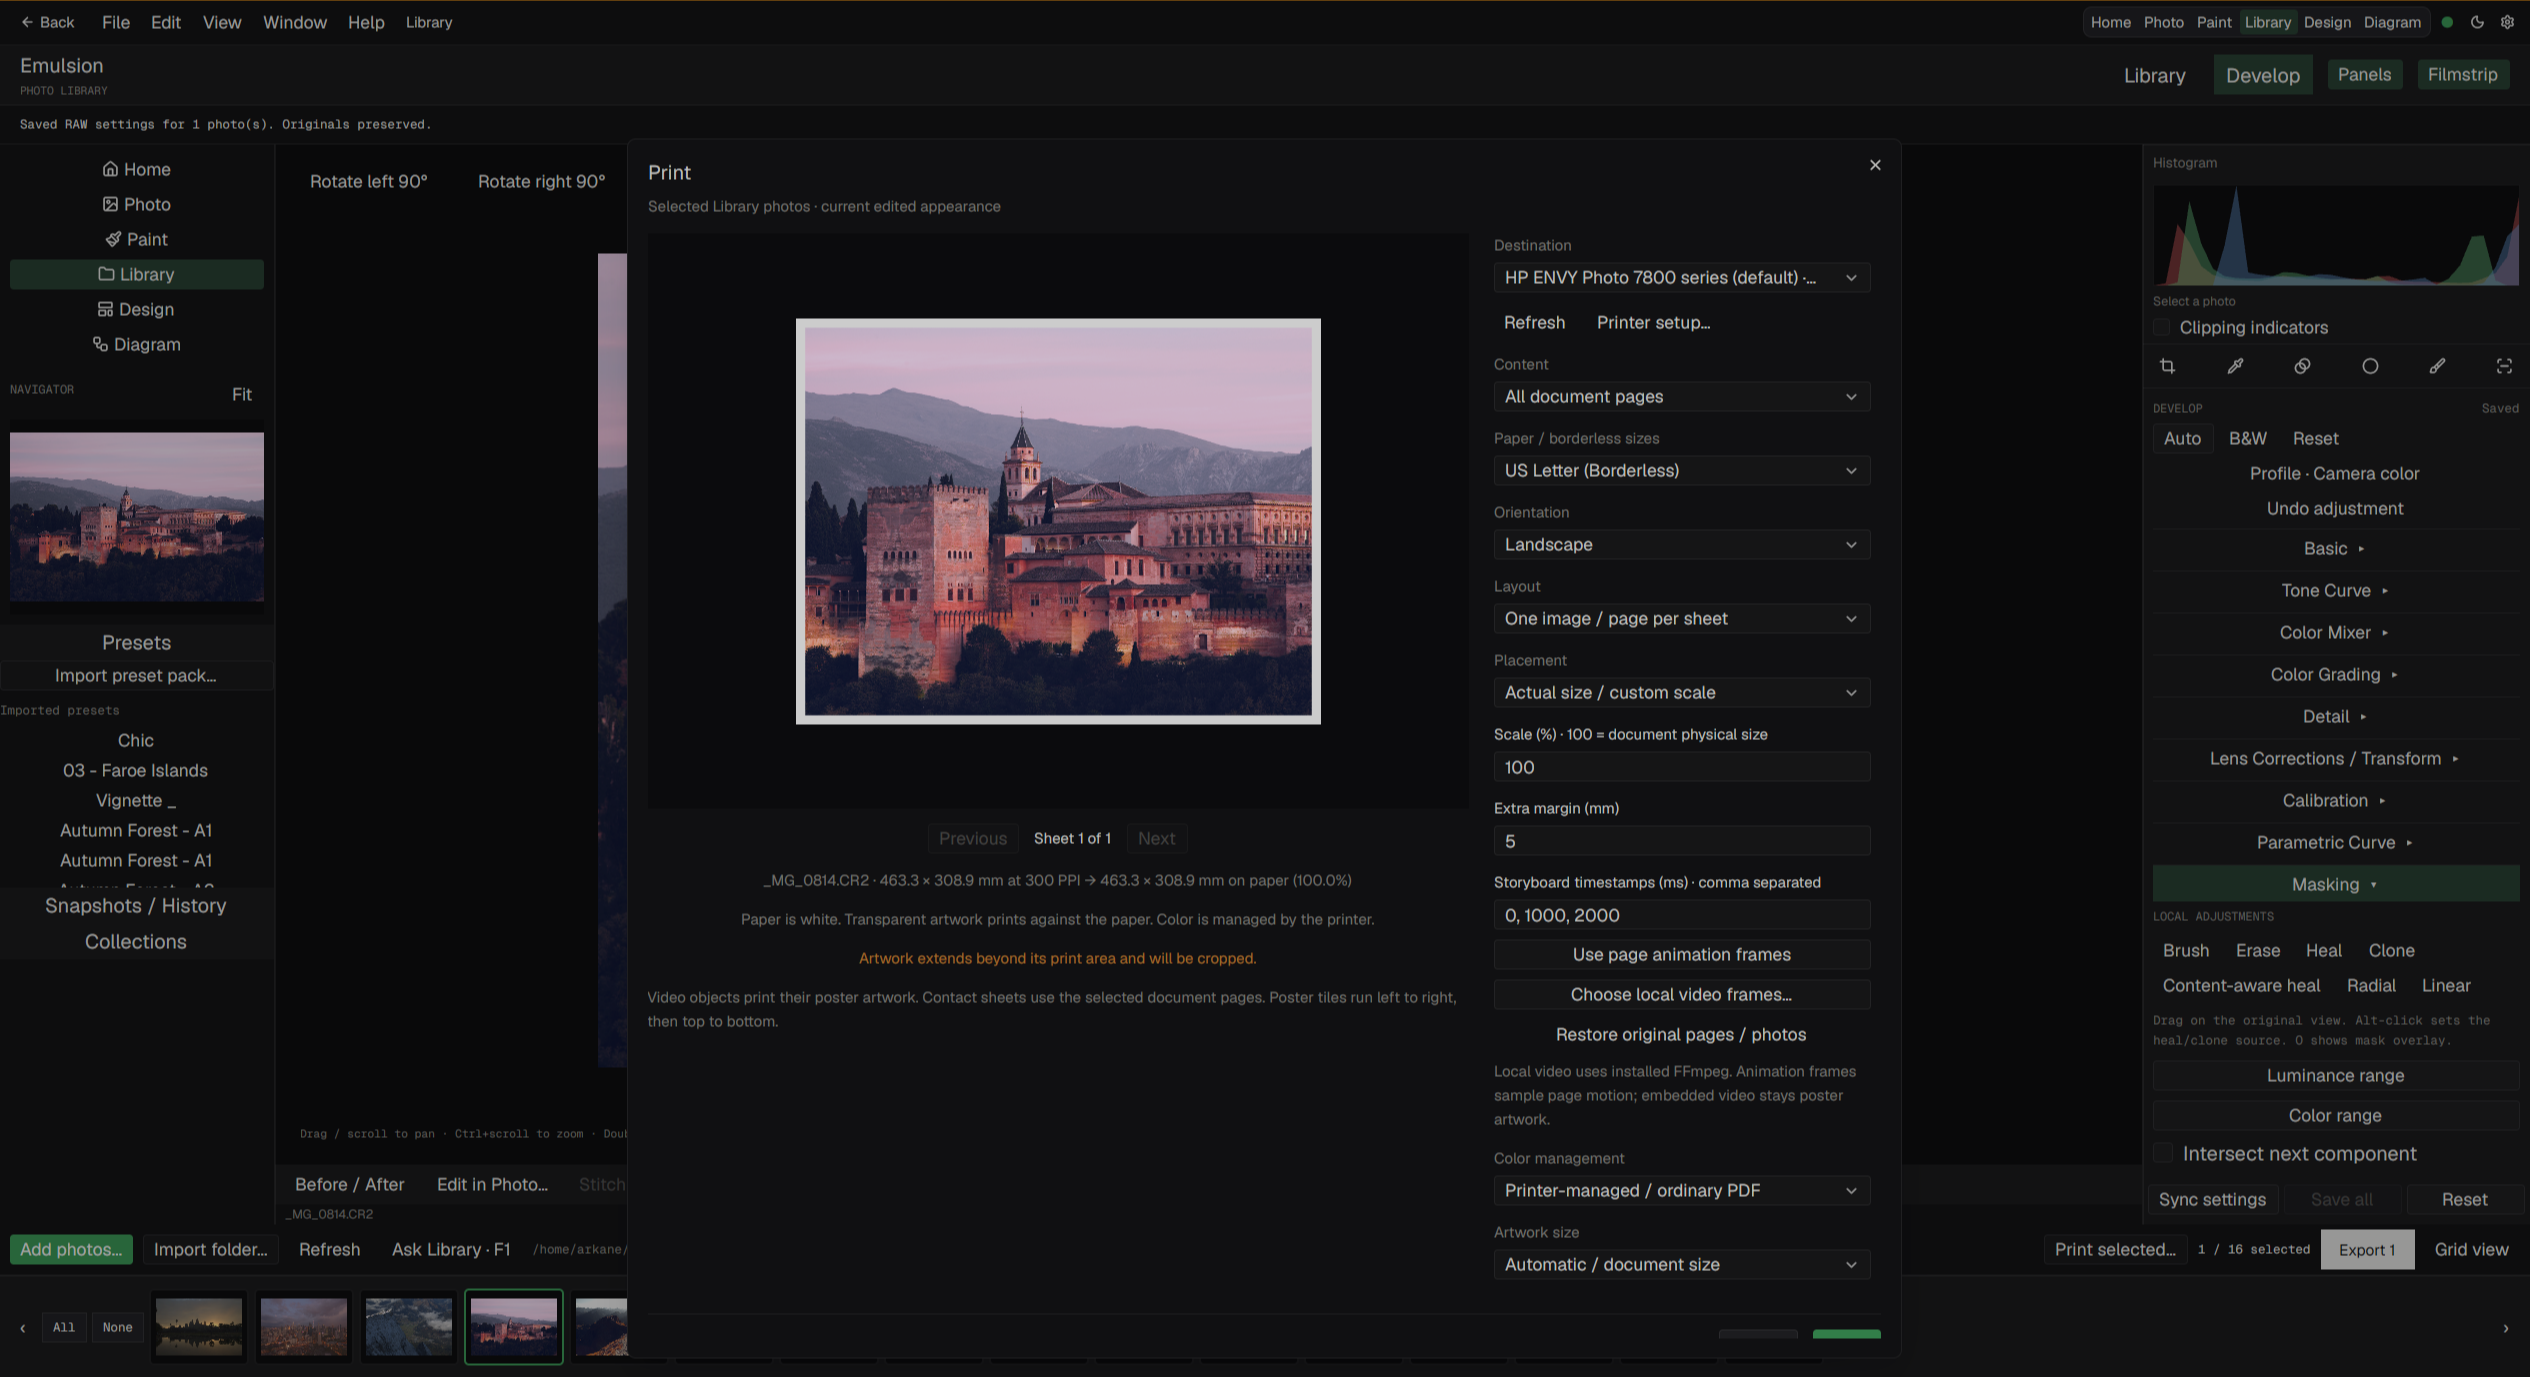
Print a developed photograph, a finished design, or a contact sheet of your selection. Set the paper and placement, then check the preview before sending it to a printer or saving a PDF.
Select photographs in Library and choose Print selected…, or open a document and choose File → Print….
Choose paper, orientation, and margins. Use Fit, Fill, or Actual size; arrange contact sheets or tile a poster across sheets.
Review the sheet previews and any cropping warnings, then print or choose Save PDF….
Printing uses the current edited appearance, including unsaved changes, without flattening your project or changing the original photos.
Print from Library · preview the edited photograph on paper and adjust its placement before printing. Select the image to view it full size.
CURIOSITY LOOKS GOOD ON YOU
What if you tried one more version?
The best ideas rarely happen in a straight line. Branch your history, explore another treatment, and come back whenever you like. Your earlier work is still there.
TRY A DIRECTION
A STUDY IN POSSIBILITYHISTORY
Original direction
An interactive illustration of exploring different looks.
AN EXTRA PAIR OF HANDS. YOUR CREATIVE DIRECTION.
Your canvas. Your tools. Your call.
Work by hand, or invite an assistant into the process. Ask it to build layers, adjust colours, or draw from a reference. Review proposed changes and keep editing the result yourself.
Connect Claude Code, Codex, OpenCode, or Kimi Code. Image generation can use Local SD, OpenAI, or Google and adds separate raster layers. Everyday editing needs no AI account or subscription.
Keep layered Photo and Paint work in .ora projects, and Design and Diagram pages in .emu projects. Library keeps development settings alongside your originals. Export a separate copy for sharing.
Start here for everyday workflows, saving your work, and optional integrations. Follow the source guides for full requirements and format details.
Getting started
Emulsion brings Photo, Paint, Library, Design, and Diagram together in one desktop app for Linux, macOS, and Windows. Its original code is MIT licensed. The creative workspaces work without an AI account.
Install the Linux x86_64 release or download the macOS Apple silicon disk image or Windows x64 installer using the button below. You can also build from the repository. Linux requires a working graphics driver; source builds also need Rust and the GPUI system libraries; Windows source builds require the MSVC Rust toolchain and Visual Studio C++ Build Tools; macOS packaging requires Rust and the standard icon tools.
Choose a workspace from Home: Photo opens an image, Paint starts a canvas, and Library opens your photo catalog. Design and Diagram offer templates or a Blank document. You can also press Ctrl + N (Cmd + N on macOS) or select + beside the tabs to open New document. Choose Blank canvas to set your own size and background, or Import photo… to open an image. Save editable work before exporting a copy for sharing.
Linux also has a local Flatpak build via scripts/build-flatpak.sh, requiring Flatpak and flatpak-builder. Its sandbox cannot use converters installed on the host. For Windows source builds, scripts/build-windows.ps1 builds an executable; add -Package after installing the documented packaging tools for an NSIS installer. Local Windows builds are unsigned; local macOS builds are signed ad hoc for local use.
Each workspace has its own tools. Library catalogues and develops photos, including camera RAW. Photo retouches and composites. Paint draws and paints with brushes. Design lays out posts, print, and presentations. Diagram builds structured flowcharts and architecture diagrams. Every workspace has a reference guide and a short first-project tutorial.
What each workspace offers
Feature
Library (RAW)
Photo
Paint
Design
Diagram
For
Culling and developing shoots
Retouching and compositing
Drawing and painting
Posts, print, and decks
Flowcharts and architecture
Start from
An imported folder
An opened image
A blank canvas
164 templates in 12 categories
22 templates
Core tools
12 Develop sections
14 tools, 7 selection modes
15 Paint tools
Shapes, text, frames, charts, tables, components
12 shape kinds, 4 connector routings
Colour and effects
Local masks (6 shapes), spot removal, colour grading
RAW files always open in Library Develop. Choose Edit in Photo… to continue in layers. Photo and Paint share one document; Ctrl + Alt + Shift + D switches between them.
Develop camera RAW files in Library, then choose Edit in Photo… after the settings have saved. Photo receives the developed pixels in a new document for layered editing. Later Library adjustments do not update an existing Photo document; use Edit in Photo again to open a new version.
Open a photograph in Photo, then choose a tool and adjust its options. Use brushes and erasers for painting, clone and heal for retouching, or smudge, gradients, and liquify to reshape the image. Add a selection or mask when an edit should affect only part of the artwork.
The right dock includes Layers, Channels, and Paths. Use Ctrl + Shift + N (Cmd + Shift + N on macOS) to create a transparent layer; F7 opens Layers. Add groups, duplicate layers, and combine raster artwork with editable text and paths. The layer controls and Properties panel hold transforms, blending, and masks; use Window → Properties to open that panel.
Choose Grade (Shift + Q with the canvas focused) for exposure, curves, colour balance, and hue/saturation adjustment layers. Select an existing adjustment layer to edit its controls. Add references through the Ref (Reference) panel to keep an image beside your canvas; references belong to the open session and must be reattached after reopening.
Enhance and refine
The Enhance panel gathers one-click looks and tools for structure, glow, skin, sky replacement, relighting, and more. Filter tools remain editable on the layer; tools that use local models can add new layers and masks. Refine or remove the result as you continue editing.
Move and align artwork
Choose Move (V) to drag a selected layer or group. With the canvas focused, arrow keys nudge by one document pixel; Shift+arrow nudges by ten. These move artwork, while Hand and Rotate View change how you look at the canvas.
Choose Paint in Home to create a canvas. Set its dimensions and background, give it a name, and select Create. Paint, erase, and smudge on separate layers so you can adjust individual parts of an illustration. Save your work as .ora to retain editable layers and history.
Use the Reference panel to keep a source image beside the canvas. References belong to the open session; reattach them after reopening. The Layers panel controls order, opacity, blending, and masks, just as it does in Photo.
Brush Library and Brush Studio
Open Brush library… from the Brushes tab of the brush panel to browse, search, pin, and organize brushes into sets and libraries. Double-click a brush or choose Brush Studio to edit its settings, shape and grain sources, or dual components. Try strokes on the Studio pad; Done publishes the draft and Cancel discards it without painting your document.
Native .embrushes packages retain editable settings and source assets. Imported .brush, .brushset, .brushlibrary, and supported sampled-tip .abr files are conversions with format-specific limits; they do not promise identical brush behavior or complete archive compatibility.
Use the brush size and opacity controls for quick changes. Hand, zoom, and Rotate View change your view of the canvas; Move changes the artwork itself.
Open Library from Home or the top bar. Import local folders into the catalog; files remain at their original paths. Create collections, search names and keywords, and filter by ratings, flags, or colour labels.
The Library panel
Browse Catalog, Folders, and Collections on the left. The photo grid and filmstrip keep your selection in view; the right panel holds Quick Develop, Metadata, Keywording, and export settings. Use Panels and Filmstrip at the top to adjust the workspace.
Find the photographs you want to keep
Click a photo to select it, Shift-click for a range, or Ctrl/Cmd-click to toggle individual selections. With the grid focused, use 0–5 for ratings and P / U / X to pick, unflag, or reject. Use G for the grid, E for loupe, D for Develop, or Enter to open the photograph in Photo.
Develop a set without overwriting originals
Use Quick Develop for a starting treatment, or open Develop for light, white balance, curves, colour, crop, and detail controls. Synchronize selected settings across photographs, or keep alternate treatments as virtual copies. RAW support depends on the camera and file; rendered JPEG, TIFF, PNG, and WebP photos can also use development sidecars.
Edits save to fingerprint-bound <original>.emulsion-raw.json sidecars after a short pause. Keep the source and sidecar together. Saved Develop history and named snapshots can be revisited; the original image is never overwritten. Save failures remain visible, and opening in Photo or exporting requires saved settings.
Add presets to Library
Select a photograph and open Develop.
Expand Presets in the left panel and choose Import preset pack…. Select a Lightroom .xmp or .lrtemplate file, an Emulsion preset .json, or a ZIP preset pack.
Choose a name under Imported presets to apply it to the selected photograph. Importing adds presets to the list; applying one is a separate step.
Turn on Before / After to compare the result, then fine-tune the Develop controls. Use Sync settings when you want to copy selected adjustments to other photographs.
Open Show import details to review compatibility notes. Supported adjustments are translated; proprietary Adobe/VSCO profiles and some settings are not reproduced, so imported looks can differ from Lightroom.
Prepare a delivery
Select photographs, choose an export preset, and set the destination. Export presets cover size, quality, depth, sharpening, and optional watermark settings. Export produces separate output files. To put the selected photographs on paper, choose Print selected… and review the print preview and layout. For portable backups of a collection, the .emulibrary format can include originals, sidecars, and supporting assets.
Choose Design in Home. Browse templates for social graphics, print, invitations, and presentations, or select Blank document to choose a size and start empty. The Blank canvas tab offers the same custom setup. A template brings its authored size and editable content into the document.
Make the layout your own
Edit text, change shape fills and strokes, replace images in frames, and arrange objects with selection, alignment, and grouping controls. Responsive row, column, and grid layouts help organize related objects. Add or remove pages to build a series or presentation.
Save, present, and share
Save a multi-page .emu project to retain the editable pages. Present shows a Design project as slides; a separate presenter view can show notes and navigation. To share selected artwork, use Export → Export selected objects… for SVG, PDF, or PNG. Supported text and paths retain vector geometry; effects that require rendering are reported by the exporter. To export every page, choose File → Export…, then Project export, for PNG, JPEG, or SVG pages or a Print PDF with optional bleed. Keep the native project for future edits.
Choose Diagram in Home. Start with a flowchart, org chart, timeline, or concept map, or select Blank document for an empty canvas with your own dimensions. You can also switch to Blank canvas in New document.
Build and explain the structure
Add shapes and editable text, then connect objects through their ports. Bound connectors follow the objects they connect. Choose straight, orthogonal, curved, or cyclical routes and add labels to describe relationships. Use containers to group related parts, and alignment controls or auto-layout to keep the drawing readable.
Browse Shapes, Templates, Containers, Themes, and Packs for reusable starting points, including AWS and Azure icon sets. Generate a diagram from text, CSV, Mermaid, or SQL with Generate from data. Use the object context menu to arrange, align, group, lock, or annotate the selection.
Keep the working diagram
Save a .emu project to retain editable pages, objects, and connections. Export an editable draw.io file, or PDF, SVG, PNG, or JPEG for sharing. Import draw.io, Visio, and Lucid files. Imported diagram formats have feature-specific limits; keep the source file and review the import report before relying on the conversion.
Opening a supported RAW file always enters Library Develop, which develops the sensor data rather than the embedded preview. Develop has twelve sections, including Basic, Tone Curve, Color Mixer, Color Grading, Detail, Lens Corrections, Calibration, Masking, White Balance, and Enhance. It also offers sensor denoise, highlight reconstruction, HDR merge, and panorama stitching. When the photo needs layers, selections, or retouching, choose Edit in Photo… to open the developed image in a new Photo tab.
Library saves Develop settings to <filename>.emulsion-raw.json beside the source without modifying it, with its own history and snapshots. Reopening the original restores these settings. Emulsion sidecars are not Adobe XMP. Keep them with the original when moving or backing up photos; rename the sidecar to match if you rename the photo. An invalid or mismatched sidecar produces an error instead of silently dropping your saved settings.
Older Photo projects with an embedded RAW recipe offer Develop in Library…. This creates an independent Library virtual copy carrying the recipe, including unsaved development settings, while leaving existing Photo layers and the original’s sidecar unchanged. For those projects, use Save as → .ora to preserve layers, history, and versioned RAW settings. Keep the original: the project stores a verified link, not an embedded RAW. If it has layers or named versions that a sidecar cannot preserve, Save also asks for a project. Use Locate original… if an identical source has moved. The project can reopen without its original, but changing RAW settings or exporting the linked RAW layer requires it. Painting directly on that layer detaches its RAW recipe; use a separate layer for retouching. If Save or Export reports that RAW development is still running, wait for the preview to finish and retry.
Camera support and colour reconstruction vary by source. Library keeps development settings and history with the source; save subsequent Photo layers in an ORA project.
Open the dock’s Panels menu and choose Recipes. The Emulsion collection holds starter recipes, camera presets, and saved looks. Other collection chips open the community library, grouped by film simulation family. Use tags to narrow a collection; each library recipe retains its creator and source in its notes.
In Library, select the photographs you want to process. Search the recipe chooser by name or tag, or expand Category for a filter. Set the format and output folder in the right dock, then select Export in the top bar.
Use Fit image and the − / + controls to navigate the preview. Drag or scroll to pan; Ctrl/Alt/Cmd+scroll or pinch zooms around the pointer. Double-click to fit again. Preview zoom uses a rendered image up to 1100 pixels; export retains its own output settings. Selecting another photo resets the view; changing the recipe keeps the view for that photo.
Choose File → Print… from an open document, or select photos in Library and choose Print selected…. The shortcut is Ctrl+P on Windows and Linux, or Cmd+P on macOS. Printing captures the current edited appearance, including unsaved document changes or Library Develop settings and the selected recipe. It does not save drafts, flatten the project, or change original photos.
Choose the paper and layout
Select an installed printer, paper size, orientation, and margins. Fit keeps the whole image; Fill crops to the available area; Actual size uses the document’s dimensions and resolution, with a scale control. Canvas zoom does not affect print size. Arrange one image per sheet, a contact sheet, a repeating grid, or a tiled poster. Preview each sheet and check cropping warnings before printing.
Save a PDF
Choose Save PDF… to create a file instead. The default Document page sizes · no scaling layout preserves the selected pages’ physical dimensions and orientation. Choose a sheet layout for contact sheets or poster tiles. PDF output saves one set of the composed sheets.
Native printing adapters are included for Linux, macOS, and Windows; physical output and platform acceptance are still being validated. Printer capabilities depend on the installed driver, and the preview is not a colour proof. The full guide covers platform requirements, borderless sizes, bleed, crop marks, and colour management.
Use undo, redo, and history branches to explore alternatives. Save an OpenRaster (.ora) project to retain editable work and history. Emulsion’s native data keeps text and paths editable; other OpenRaster readers can use the included layer previews. Newly saved native version 2 projects require an updated Emulsion build for native editing.
Open the dock’s Panels → Timeline, then choose Replay drawing to play the picture back from its history and export a GIF. Leaving Timeline stops playback and returns to the full document.
Save Design and Diagram pages in a .emu project, which retains each page’s native editable content and history. Library has its own saved development history and snapshots in sidecars. Export is a delivery step: keep the native project, or the photo originals with their sidecars, for future editing.
Use ORA for layered Photo and Paint work, and EMU for multi-page Design and Diagram projects. Open layered PSD/PSB and supported 8-bit GIMP XCF files; import fidelity depends on the source features.
Photos and artwork
Open PNG, JPEG, WebP, TIFF, BMP, GIF, SVG/SVGZ, JPEG XL, OpenEXR, and more. Camera RAW support varies by camera, model, and compression. Nikon HE/HE★ decoding is experimental, with approximate colour and tone reconstruction.
Common exports
PNG, JPEG, WebP, and TIFF; PNG/TIFF support 16-bit output. Linked RAW exports offer sRGB or Adobe RGB profiles and full, half, or quarter sizes. Choosing Adobe RGB does not recover colours already clipped in the sRGB working document.
Layered exports
Layered PSD and 8-bit XCF. XCF exports visible top-level layers with adjustments, masks, and styles baked into each layer; hidden layers are omitted.
Design and Diagram
Keep an EMU project for native editing. Design opens and exports editable PowerPoint and Lottie, and exports standalone HTML, selection SVG, PDF, or PNG, and project PNG, JPEG, or SVG pages or a Print PDF. Diagram imports draw.io, Visio, and Lucid files, and exports draw.io, PDF, SVG, PNG, and JPEG. Supported paths and text remain vector geometry, while some effects need rendered fallbacks. Exports do not carry every native object association.
Library backups
EMULIBRARY bundles can include originals, virtual copies, sidecars, presets, and mask assets. Older JSON catalog backups contain references only.
Extra converters
HEIC/HEIF, AVIF, PDF/PostScript import, and other formats can use installed external converters. AVIF, HEIC, JPEG XL, and raster-to-PDF export can require external tools; Design selection PDF export has its own native path. Flatpak cannot use host converters.
CMYK sources are converted to RGB for editing, with support depending on format and profile. CMYK PSD/PSB support is limited to the saved merged appearance for supported 8-bit files. Projects and exports retain RGB pixels, not CMYK ink separations. Formats without transparency composite over white.
Install and authenticate a supported Claude Code, Codex, OpenCode, or Kimi Code CLI, then click Ask AI or press F1 (or Alt + F1) to open the Ask bar and select Assistant. Ask it to inspect the canvas, use a reference, build artwork, adjust colours, or automate a recipe. Review proposed document changes with Apply/Skip. Model access or a provider subscription is not bundled.
Emulsion connects its MCP server to the active app so the assistant can call editing operations directly. A connected MCP client lists the current catalog with tools/list. Starting emulsion mcp-serve alone still answers that request but cannot edit an open document without the app connection.
Generate an image or fill a selection
Open Settings with Ctrl + K (Cmd + K on macOS) and configure Image generation, then choose Local SD, OpenAI, or Google in the Ask bar opened by Ask AI or F1. Local SD uses an A1111/Forge API server. Cloud providers require their own API keys and separately billed access. Enter a prompt; generated results arrive as labeled raster layers you can hide or undo. With an active selection, generation uses the surrounding canvas as context.
Environment API keys take precedence over saved keys: OPENAI_API_KEY for OpenAI, and GEMINI_API_KEY before GOOGLE_API_KEY for Google. Cloud generation sends prompts and fill context to the selected provider. Save & test checks key/model access, not generation quota. A Google free_tier error with limit: 0 needs a billing or quota change for that API project; waiting for a retry timer does not add quota. Cancelling discards the result but does not guarantee cancellation of provider processing or charges. Attached references are available to Assistant; image modes use the prompt and selected canvas context.
Optional subject selection, background removal, inpainting, face restoration, and upscaling require the relevant models or providers to be configured.
Open the theme button (a sun or moon icon) in the top bar and choose Light or Dark. On Linux, choose Follow Omarchy in the same menu to follow your active Omarchy theme. Emulsion picks up theme changes live while it is running and shows the theme’s name in the menu item and the button’s tooltip. No hooks or system configuration changes are needed. Choose Light or Dark to return to Emulsion’s built-in palette. The canvas surround stays neutral, and theme changes never alter your artwork’s pixels. The current interface uses compact chrome; switch between Photo, Paint, Library, Design, and Diagram from the top bar. Use Home to return to your projects.
Use the dock’s Panels menu for Navigator, Info, Recipes, Timeline, History, or Histogram. The Window menu also opens Properties, Adjustments, History, Info, Layers, Channels, and Paths. Tool buttons support Tab navigation and Enter/Space activation. Focused sliders accept arrows, Shift+arrow for larger steps, and Home/End for limits.
These are the default editor shortcuts. On macOS, Ctrl-based shortcuts also accept Cmd; Alt is the Option key. Bare tool keys apply when the canvas has focus; text fields retain typing behavior. Library has its own selection, culling, and preview controls described above.
F1 / Alt + F1
Toggle the Ask bar; select Assistant or an image provider
Ctrl + K
Settings, including the Shortcuts section
Shift + Q
Grade tool (canvas focused)
H / hold Space
Hand tool / temporary pan (canvas focused)
Z
Zoom tool; hold Shift or Alt to zoom out
R
Rotate View tool (canvas focused)
Ctrl + 0
Fit the editor image to the canvas
Ctrl + 1
Set editor zoom to 100%
Ctrl + +
Zoom in; Ctrl + = also works
Ctrl + −
Zoom out
[ / ]
Decrease / increase brush size (canvas focused)
Ctrl + Alt + I
Image size
Ctrl + Alt + C
Canvas size
Ctrl + Shift + N
New transparent layer
Ctrl + F
Search layers
Ctrl + Alt + Shift + D
Switch Photo / Paint mode
Tab
Hide / show panels (canvas focused)
F5 / F7 / F8
Brush Settings / Layers / Info
Ctrl + S
Save a project or eligible RAW sidecar
Ctrl + Shift + S
Save as
Ctrl + Alt + Shift + W
Export
Your bindings may differ. Open Settings → Shortcuts to see the effective bindings. Use open keymap file to edit overrides, then reload to apply them.
The documentation index separates current user guides from dated reports and plans. Use the current guides for feature behavior; a backlog or benchmark report is not a promise of supported features.
Recover work and find your files
Home lists recovery copies left by other sessions and offers Open or Discard. Autosaves are recovery copies, not a replacement for saving your project. Settings, shortcut overrides, recipes, brush libraries, and recovery files live in Emulsion’s application data directory; its location depends on the platform and environment.
The files, folders, and environment guide covers paths, backups, command-line options, installer flags, and log capture. Saved API keys are unencrypted in settings.json; remove them before sharing that file with a bug report.
When something does not work
Use the troubleshooting guide for missing converters, RAW sidecar or original-file errors, undetected assistant CLIs, generation quotas, theme issues, and startup failures. For an undetected CLI, Settings offers a provider path field, use path, and detect again.
On Linux, a machine without usable hardware graphics needs an installed software Vulkan driver. Windows can fall back to WARP; macOS has no software fallback. GPU brush painting is experimental and opt-in. See the dedicated guides for renderer and compute controls.
 emulsion